Powered By

Powered by Blogger

Senin, 28 Februari 2011

Top 10 Box Office Movies Wallpaper Generator

IMPloader is a script that fetches the posters for the top 10 Box Office movies of the week and automatically generates a wallpaper. You can customize how many images are used (but there's a maximum of 10), the style (black, white and polaroid), width and height of the wallpaper and border of the images.

Here are two examples of wallpapers generated using IMPloader:

IMPloader

IMPloader


Usage


To use it, you'll need Ruby and Imagemagick. Install these packages in Ubuntu using the following commands:
sudo apt-get install ruby imagemagick

Then, download the script from Gnome Look and extract it on your desktop.

Now you'll have to run the script - the first time is for generating the config file:
cd ~/Desktop/118501-Desktop
./imploader.rb

This will create a new config file under ~/.imploaderrc. Open it with gedit:
gedit ~/.imploaderrc

Here you can customize everything about your wallpaper. The config file is well documented so I'll not get into details. If you do not edit the "TEMPPATH" variable inside the config file, the new wallpaper will be created on your desktop (and it will be called collage.jpg).

Once you're done with the config file, run the script again and it should generate the wallpaper:
./imploader.rb

If you want the wallpaper updated once a day you can add a cron-job for this or simply add the imploader.rb script to your startup applications to generate a new wallpaper each time your computer starts.


Want more cool wallpapers? Check these out:

Ubuntu Mascots Wallpaper

I recently came upon a beautiful wallpaper that includes all the Ubuntu mascots and wanted to share it with you:

Ubuntu Mascots Wallpaper


The wallpaper was created for the Ubuntu Karmic Koala release and it initially  only included the middle shelf animals but it was recently updated with all the new mascots.


Download @ DeviantArt

Start uTorrent Server As A Daemon With This Upstart Script

uTorrent server Linux

I've recently built a small home server powered by Ubuntu and wanted to give uTorrent Server for Linux a try. I needed a way to demonize uTorrent so it starts automatically and I can easily start/stop it so I've used an upstart script (found here) for this. Here's exactly how to do it:

To create an upstart script for uTorrent, move all the uTorrent files to the /home/yourusername/.utorrent folder, then run the following command:

sudo nano /etc/init/utorrent.conf
(replace "nano" with your favourite editor)

and copy/paste the following code:

description "utorrent startup script"

start on (local-filesystems and started dbus and stopped udevtrigger)
stop on runlevel [016]

script
cd /home/yourusername/.utorrent
exec su yourusername -c "/home/yourusername/.utorrent/utserver"
end script

Of course, replace "yourusername" with your username in the commands above. Now there's only one step left:
sudo ln -s /lib/init/upstart-job /etc/init.d/utorrent

From now on you can start/stop uTorrent using the following commands:
sudo start utorrent
sudo stop utorrent

Also see:

Minggu, 27 Februari 2011

Make Windows 7 Look Like Ubuntu With Maverick For Win7

Maverick for Windows 7 theme

And now for something different... Maverick for Windows 7!

If you dual-boot or have to use Windows 7 for work and miss Ubuntu, here's something you can use to make Windows look more familiar: a Windows 7 theme called "Maverick for Win7" designed to look like the Ubuntu Ambiance theme (the latest version in Ubuntu 10.10 Maverick).

Besides the actual style, the Maverick for Win7 package also comes with fonts, the Ubuntu 10.10 default wallpaper, a start Orb image and Ubuntu Sounds Scheme for Windows. Besides these, the Maverick For Win7 page also links to various applications and other tricks you can use to make Windows 7 look like Ubuntu. For instance you can use Gdipp to make the Windows fonts look like in Ubuntu or an application to change the Windows 7 start button and even a port of the DMZ Cursor theme for Windows. You can read about all these at the Maverick for Win7 DeviantArt page.

The theme is of course not perfect. The author explains that some applications don't look too good with this theme, for example Firefox 4 (which used to look ok but then an update broke it), some elements of the original Ubuntu theme couldn't be implemented because of Windows limitations and there are some other bugs too. Also, the theme only works with Aero.

I haven't tried Maverick for Win7 because I don't use Windows, but I must say then even with the these limitations, the theme looks quite good in the screenshot, don't you think?


Download Maverick for Win7 @ DevianArt (remember to make a backup before installing the style!).


via UbuntuPortal; image credits: dpcdpc11 @ DeviantArt

Last Week's Top Posts (Week 8, 2011)

  1. Gnome Shell 2.91.90 Released - Screenshots And Video
  2. Try This Great Looking Conky Lua Configuration For Ubuntu, Fedora Or Linux Mint
  3. LibreOffice 3.3.1 Has Been Released
  4. Get Your USB Drives To Work With VirtualBox (Ubuntu Host)
  5. Set DockBarX To Use Compiz Scale Plugin (Unity-Like)
  6. Rescue Lost Partitions Data With GParted 0.8
  7. Unity Update (3.4.6) Brings New "Super" Shortcuts For The Launcher [Ubuntu 11.04 Development]
  8. Synapse (Launcher) 0.2.4 Released With New Plugins
  9. Download Tribler 5.3.7 (From SVN) .deb For Ubuntu 10.10
  10. Unity Launcher Gets Unofficial Patch To Allow Icon Resizing. But Will It Be Approved?

2 More Beautiful, Easy To Set Up Conky LUA Configurations

Here are two more great and easy to set up Conky LUA configurations: Conky HUD and Conky Grey:


Conky HUD - DOWNLOAD:

Conky HUD


Conky Grey - DOWNLOAD:

Conky Grey


Both Conky Grey (and the other color variations) and Conky HUD can be installed by creating a folder called ".conky" in your home directory and placing both files extracted from the downloaded archive (either Conky HUD or Conky Gray - or both) into this folder.

Then start Conky HUD using the following command:
conky -c ~/.conky/conkyrc_HUD

Start Conky Grey using the following command:
conky -c ~/.conky/conkyrc_grey

To customize Conky HUD / Conky Gray, open the "conkyrc_HUD" or the "conkyrc_grey" file and:
  • to modify the text color change the "color" value (for all the "color" parameters like "color1", "color2" and so on.
  • to change the position on the desktop, modify the "gap_x" and "gap_y" values.

For Conky HUD: to modify the ring colors, open "conky_HUD.lua" and replace the "00FFBB" value (do a "search and replace all) with the color you want.

For Conky Gray: to modify the ring colors do the same as above, but replace "ffffff" with the color you want for the rings.

Also see: Try This Great Looking Conky Lua Configuration For Ubuntu, Fedora Or Linux Mint

How To Start Applications Minimized In Linux (With Devilspie)

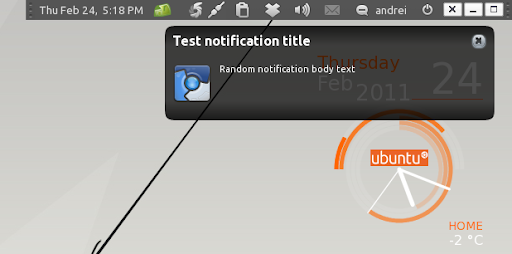
Devil's Pie ("devilspie") is an utility that lets you perform various actions on windows. While some of its functionality can be found in Compiz, there's one cool feature that Devilspie provides which is not available in Compiz (that I know of anyway): minimizing a window as soon as it's open.

Devilspie is also very useful for those that do not use Compiz. It can perform the following actions on the windows you open: minimize, move them to a certain workspace, maximize, fullscreen, unmaximize, maximize vertically or horizontally, pin (visible on all workspaces), undecorate, resize windows, set the opacity and more.


Install Devilspie


To install Devilspie in Ubuntu, click the button below:


If you prefer to install it via command line, use the following:
sudo apt-get install devilspie


1. How to use Devilspie without a GUI


There is a GUI to configure Devilspie (see "2. How to use Devilspie with a GUI"), however I've started with the manual way of doing this so you'll understand how it works.


To use Devilspie, you'll need to create a configuration file for each application you want to start minimized, maximized and so on. Firstly, create a folder called ".devilspie" in your home directory:
mkdir ~/.devilspie


Start application minimized


Now let's say you want to create a rule to start a Terminal minimized. To do this, you would have to create a file called "terminal.ds" in the ~/.devilspie folder you've just created and paste this:
(if
(is (application_name) "Terminal")
(begin
(minimize)
)
)

Then save the file and start Devilspie via a terminal:
devilspie

Now when you open a terminal (Gnome Terminal), it should be automatically minimized. Besides "application_name" you can also match a window by its "window_name", "window_role", "window_class" or "window_xid". But how do you know a window name, class and so on? Create a file called "debug.ds" in the ~/.devilspie folder and paste this:
(debug)

Now when you start Devilspie in a terminal, it should output the window class, name and so on for every running window / application.

For more info, visit the Devilspie documentation page.


Start application on X workspace / viewport


You can already do this using Compiz, but it's a cool feature for those that use Metacity. For the same application (Terminal), to set it to open on workspace 2 you would need to use the following configuration in the "terminal.ds" file:
(if
(is (application_name) "Terminal")
(begin
(set_workspace 3)
)
)

"set_workspace" only works with Metacity. If you want to do while using Compiz, use "set_viewport" instead of "set_workspace".

More actions at once

What if you want to open an application on a workspace AND set it to start minimized? Use this:
(if
(is (application_name) "Terminal")
(begin
(set_viewport 3)
(minimize)
)
)


2. How to use Devilspie with a GUI (gDevilspie)


gDevilspie

There is a GUI which makes configuring Devilspie easier. To install it in Ubuntu, click the button below:


or open a terminal and copy/paste the following command to install it:
sudo apt-get install gdevilspie

Using gDevilspie you can start or stop Devilspie, set it to start automatically at login, add window rules, get a window name, class and so on automatically and assign actions as well as directly paste the code.

To add a new rule using gDevilspie, click "Add", under "Create a new rule named" enter a name for your new rule:

gDevilspie

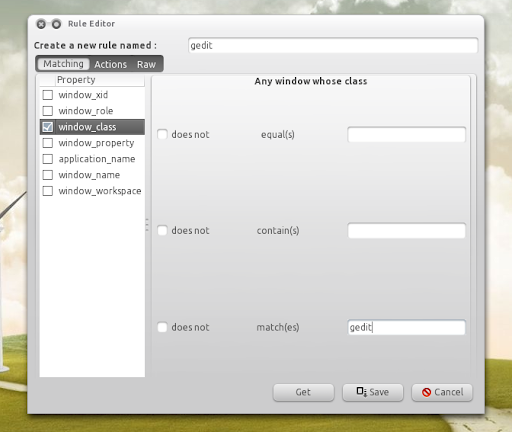
Then select "window_class" (or some other matching rule) and click the "Get" button at the bottom of the window - this will display all open windows and you can select a window for which gDevilspie will automatically fill:

gDevilspie


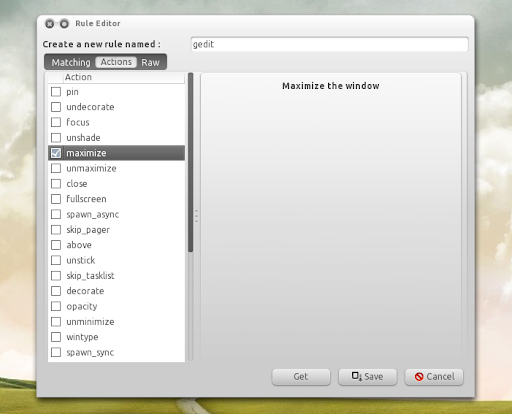
Now, on the "Actions" tab select the action you want to apply for your new window matching rule, like minimize, maximize and so on:

gDevilspie


Important: if using "window_class" doesn't work for you, try "application_name" or "window_name". Further more, in my test using the exact window_class (or application_name) didn't always work so in some cases it's best to use "matches":

gdevilspie


Also see: Make Applications Always Open On A Given Workspace (Viewport) Using Compiz

Sabtu, 26 Februari 2011

G'MIC For GIMP Ubuntu PPA

G'MIC GIMP

G'MIC (GREYC's Magic Image Converter) is a tool that comes with a lot (more than 190) of pre-defined image filters and effects for GIMP and is available for Window, Linux and Mac OSX.

The G'MIC Sourceforge page offers .deb files for download, but because new G'MIC versions are released very frequently, it's a good idea to use a PPA to stay up to date with the latest versions in Ubuntu. Roberto @ LFFL has created such a PPA so you can easily stay up to date with the latest G'MIC for Ubuntu 10.04 Lucid Lynx and 10.10 Maverick Meerkat.

Add the PPA and install G'MIC for GIMP in Ubuntu using the following commands:
sudo add-apt-repository ppa:ferramroberto/gimp
sudo apt-get update
sudo apt-get install gmic gimp-gmic


G'MIC is very easy to use! You don't need any experience to apply some cool effects to your photos. Simply select a photo, run G'MIC and apply an effect. That's all!

To use G'MIC once installed, open a photo in GIMP and go to Filters > G'MIC and a dialog will pop-up where you can select the effect you want to apply. Each effect is of course customizable and you can see a live preview in the G'MIC window.


For tutorials and help, you can visit the G'MIC group on Flickr.


More GIMP resources:


Thanks to Roberto @ LFFL.org for the PPA!

Unity Keyboard Shortcuts List

Unity Ubuntu Keyboard Shortcuts

A while back, Jorge Castro set up a page on the Ubuntu Wiki for all the Unity keyboard shorcuts and the page was always updated once Unity gained new keyboard shortcuts. For some reason that page is no longer available and the Unity keyboard shortcuts documentation moved to AskUbuntu:

This page will document the keyboard shortcuts for Unity as they get defined. Please feel free to add more!

Note: Some of these aren't implemented yet as Unity is in Alpha, but we're putting these here to document them ahead of time.

Wherever the page is located, it's nice to have this documented - I don't know about you but I for one have always missed a keyboard shortcuts list for Compiz.


If you discover some new / undocumented Unity (for Ubuntu 11.04) keyboard shortcuts, post them @ AskUbuntu Unity Keyboard Shortcuts page.

Kamis, 24 Februari 2011

Unity Update (3.4.6) Brings New "Super" Shortcuts For The Launcher [Ubuntu 11.04 Development]

Unity screenshot

A new Compiz-based Unity version (3.4.6) was uploaded to the Ubuntu 11.04 repositories minutes ago, getting one of the features you've just seen in the Unity 2D video we've posted earlier: when pressing and holding the Super key, a number is displayed for each application in the Unity launcher and pressing that number will launch / raise that app. However, in the Compiz Unity you also have a shortcut for the application/file places, expo and trash as you'll see in the video below (this isn't available in Unity 2D yet).

Further more, pressing the Super key (without holding) will activate Dash - just like clicking the Ubuntu logo in the top left corner.

Another change that came with today's update is that now Dash covers the whole screen (at least that's how it works on my netbook):

Unity screenshot

Unity screenshot

Unity screenshot


Here's a video to understand exactly how this works:


As you can see in the video above (and compare it with the Unity 2D video we've posted today), the Compiz-based Unity seems behind Unity 2D in terms of both functionality and looks but both Unity versions should be at the same level once Ubuntu 11.04 is out.

For a complete list of changes, check out the Unity 3.4.6 changelog.

More Ubuntu 11.04 / Unity news and videos.

Get Notifications With A Close Button In Ubuntu

Awn notification daemon

A lot of people want a close button for the Ubuntu notifications but unfortunately this won't happen - they don't want NotifyOSD to be customizable. But you can get notifications that have a close button by using the AWN Notifications Daemon.

We have a patched NotifyOSD that provides options to move the notifications to a different corner and such, but unfortunately it doesn't have an option to add a close button, however not many people are aware of the "Notification daemon" Avant Window Navigator applet. This applet has been around for a long time and it replaces NotifyOSD, providing some cool customizations (and of course, the notifications have a close button!): you can place the notifications anywhere on the screen, you can set it to display an icon in AWN that you can use to turn the notifications on/off with a click, set a sound for the notifications, specify custom colors for the notifications (or use the AWN theme colors), transparent (gradient factor) and more.

There's only one feature missing in the AWN Notification Daemon: there's no option to configure the font size. You can configure the font color, make the text body bold, but you can't change the font size and while the notifications look ok when using the default Ubuntu 10.10 font size (11 - but it looks ok with a font size of 10 too), it looks kind of small on my system with my preferred font size (9).


How to configure AWN Notification Daemon


Gconf editor AWN notifications daemon

To use the Avant Window Navigator Notification Daemon applet, simply install Avant Window Navigator and all the extra applets and add the "Notification Daemon" to the dock.

AWN Notification Daemon applet doesn't have a settings dialog, but you can tweak it using Gconf Editor. To customize it, press ALT + F2 and enter:
gconf-editor

Then navigate to apps > awn-applet-notification-daemon (this is for the latest AWN from the AWN trunk PPA, it may be apps > avant-window-navigator > awn-applet-notification-daemon on older versions of Avant Window Navigator). Clicking a key will display its description at the bottom so you'll know how to tweak it. The most important key is: "kill_standard_daemon" - make sure this is enabled or else the AWN notifications won't work.

For instance, "override_x" is the horizontal position on the screen (for which I've used "1900" because my screen width is 1920 and I want the notifications to be displayed on the right), "override_y" is the vertical position (for which I've used "30" so the notification dialog is displayed in the top right corner) and "gradient_factor" is the transparency. That should be enough to get you started.

To customize the colors, uncheck the "use_theme" box, then specify a "text_colour" and "bg_colour" and so on.

An important feature you may want to turn on is "show_icon". This will display an icon on your Avant Window Navigator dock which you can then click to temporarily disable/enable the notifications.


How to test the notifications


When you configure the AWN Notification Daemon notifications, you'll want to see how they look. You can send a test notification by using "notify-send". To use it, install the following package:
sudo apt-get install libnotify-bin

Then copy/paste the following command in a terminal (this is the command I've used for the screenshot in this post, you can tweak it any way you want):
notify-send --icon="chromium" "Notification title" "Test notification - body text"


Want the regular NotifyOSD notifications back? Simply remove the applet from Avant Window Navigator.

New Unity 2D Design On The Way (Video)

Unity 2D (Qt) is finally getting closer in design to the regular Unity. Check out this video recorded by by om26er:


The changes you can see in the above video are not yet available in the Unity 2D PPA, but expect it to land soon.


Thanks to Gaurav for the tip; video thanks to om26er

Gnome Shell 2.91.90 Released - Screenshots And Video

Gnome Shell 2.91.90 was released yesterday getting some final adjustments according to the release announcement:

This release just about concludes user interface changes anticipated before GNOME 3.0. The only significant change we expect after this release is to add a native network indicator based on NetworkManager 0.9.


Gnome Shell 2.91.90 video


Here is a video I've recorded with the latest Gnome Shell 2.91.90 - not the best quality but as usual, the Shell recorder doesn't play very nice with my Nvidia graphics card:


What's new in Gnome Shell 2.91.90


Gnome Shell screenshot

- Gnome Shell now uses automatic workspaces - we've already covered this so I'll not get into details.


Gnome Shell window titlebar

- The minimize and maximize buttons were removed from the window titlebars. This is something awkward in my opinion: while I understand why they've removed the minimize button (there is nowhere to minimize a window because Gnome Shell doesn't have a window list like the old Gnome panels), the maximize button will be missed by many. Sure, you can drag a window to the top of the screen to maximize it, but that's not enough. Further more, I've noticed that there's no close button ("X") for the windows that have a "Close" button.


- Hold notifications while the user is marked busy. This sounds a lot like the "Silent mode" proposed for Unity that we've talked about a while back.


- Added a PolicyKit authentication agent; requests to the user for authentication from PolicyKit now show up as shell-themed dialogs. Check out THIS post for more info and videos (including fingerprint authentication).


- Suspend now shows up in the user status menu while Power Off is hidden and only shows up while holding down the ALT key. This is yet another new feature for which I don't see the point but maybe you can guess why they've done this.


Gnome Shell screenshot

- Larger icons the the launcher and application browser


Gnome Shell screenshot

Gnome Shell Screenshot

- The panel now uses round corners


Other changes:
  • You can now change workspace by mousewheel scrolling over the thumbnails
  • Add audio feedback when scrolling over the volume status icon
  • Remove the window filtering and highlighting when using the dash application menu
  • And many other minor improvements. A complete list can be found HERE.


If you want to try out Gnome Shell you can use the Fedora or openSUSE live CDs or compile it yourself in Ubuntu.

Rabu, 23 Februari 2011

LibreOffice 3.3.1 Has Been Released

LibreOffice

A quick update: LibreOffice 3.3.1 has just been released, bringing new colored icons and eliminates various problems to improve stability. This is a minor release so that's about everything that's new in this release.

And also related to LibreOffice: the Document Foundation tries to collect donations worth of 50,000 euros required to establish The Document Foundation in Germany. Well, you'll be glad to know that the donations already reached 40,000 euros in just one week so it seems the goal will be achieved since the closing date is March 21st.

Note for Ubuntu users: the LibreOffice PPA currently provides LibreOffice 3.3.0 for Ubuntu 10.04 and 10.10 and LibreOffice 3.3.1 RC1 for Ubuntu 11.04. It will probably be updated shortly with the latest LibreOffice 3.3.1 for all three Ubuntu versions. For instructions on installing LibreOffice from the PPA, see our post on LibreOffice Ubuntu PPA


Download LibreOffice 3.3.1

Edubuntu 11.04 Gets Package Selection In Ubiquity (So You Can Chose What To Install)

Edubuntu 11.04 is becoming an amazing Ubuntu flavor. For instance, it seems that Edubuntu will ship with both Unity 2D (according to the latest edubuntu-meta) and Ubuntu Classic desktop by default (but the regular Unity will still be available). Unity 2D will also be used as fall-back for those that try to use the regular Unity but don't have a capable graphics card. Further more, LibreCAD (formerly CADuntu), a great 2D CAD drawing tool based on the community edition of QCad ported to Qt will also be included by default starting with Edubuntu 11.04.

But the best part is that Edubuntu 11.04 Natty Narwhal will let you chose the packages you want to install by providing a package selection dialog in Ubiquity. Stéphane Graber explains:

With it, users can easily opt out of some of our meta-packages or individual packages. In the future you will also be able to install extra packages this way (that aren’t installed in the live environment but are present on the DVD).

Edubuntu Package Selection in Ubiquity

If only Ubuntu would provide a similar tool... that would be a killer feature for a lot of us. But this was proposed multiple times and it was turned down so I guess we won't see this in Ubuntu any time soon.


Image credits: Stéphane Graber

Synapse (Launcher) 0.2.4 Released With New Plugins

Synapse launcher

Synapse, the cool new semantic launcher for Linux written in Vala and powered by Zeitgeist reached version 0.2.4 codename "Anandamide". This version brings new plugins: calculator, Launchpad plugin (find bugs and branches on Launchpad), Pastebin, Imgur (upload images) and a selection plugin (allows you to execute actions on currently selected text).

The new version also brings multiple fixes to the Zeitgeist searches, copy to clipboard action, UI fixes and speedups and other bug fixes.


Install Synapse 0.2.4 in Ubuntu


These changes were already available for those of you that use the bleeding edge Synapse PPA, but now they are also available in the stable PPA.

To add the stable Synapse PPA and install the latest Synapse in Ubuntu, use the following commands:
sudo add-apt-repository ppa:synapse-core/ppa
sudo apt-get update
sudo apt-get install synapse

For the Pastebin plugin, you'll also need to install the following package:
sudo apt-get install pastebinit


Please note that the new upload to Imgur plugin doesn't show up in the plugins list. To use it, switch to the Images tab in Synapse, press the down key and select an image, then press TAB and you should see an option that lets you upload the image to Imgur.

Synapse needs Zeitgeist dataproviders to work properly. See our initial post on Synapse for instructions on installing more Zeitgeist dataproviders.


Like Synapse and want to help? You can write plugin description on the Synapse wiki - click the help button in in Synapse's preferences window (in the plugin tab) and you'll be taken to a wiki page.


[via ~mhr3]

Selasa, 22 Februari 2011

Download Tribler 5.3.7 (From SVN) .deb For Ubuntu 10.10

Tribler

Tribler is a decentralized BitTorrent client - that means that you can search for torrents from the peers themselves so you do not have to use external servers.


We've covered Tribler last week but you had to download it from SVN and the process was a bit complicated. But WebUpd8 reader Dakira has created a .deb for the latest Tribler from SVN (5.3.7) so it's now very easy to install.


To use Tribler, download and install the "python-vlc" package first, then Tribler:


The "python-vlc" package is required to play a video while it's still downloaded. This didn't work for me, however Darkira says that even though the video opens in an external window (even if you check the option to play in the same window), it does work so maybe there is some issue on my end.

Please note that this .deb was created for Ubuntu 10.10 Maverick Meerkat. It might work with other Debian-based Linux distros that provide Python 2.6 but it wasn't tested.

Many thanks to Dakira for the .deb!

Try This Great Looking Conky Lua Configuration For Ubuntu, Fedora Or Linux Mint

Conky lua

Despot77 posted a great looking Conky Lua configuration at Gnome-Look that displays some beautiful rings for the cpu, clock, ram, swap, disk, net and also comes with an easy way to display the weather that doesn't involve you register to any website, work with API keys and so on. Another thing I like about this configuration is that it comes with various color themes and distribution logos: Fedora, Linux Mint and Ubuntu (update: the package also provides Debian and openSUSE configurations).

Here is a screenshot of my desktop - setting it up took under one minute so don't get scared about the instructions below, it's actually quite easy:

Conky


To set it up (obviously, you must install conky first), download the archive from Gnome Look, extract it and:

1. Create a folder called ".conky" in your home directory and copy the Linux Mint / Ubuntu / Fedora image to this folder.

2. In your home directory create a folder called ".lua" and inside this folder, create a new folder called "scripts". Here, copy the "clock_rings.lua" file.

3. Copy the "conkyrc" file in your home directory and rename it to ".conkyrc" (just add a dot in front of the filename).

4. To set the weather for your city, go to http://weather.noaa.gov and search for your city. The URL will then look like this (this is for my country / city): http://weather.noaa.gov/weather/current/LRBS.html - copy the code at the end (LRBS in my case) and in the ~/.conkyrc file, replace "LQBK" with your code.

Want more Conky configurations? Browse our Conky tag.

TagPlayer Adds Ubuntu Sound Menu, Multimedia Keys Support

TagPlayer

Wow, that's a lot of applications that were updated this week. The latest one: TagPlayer.

TagPlayer is a very simple music player that plays your local music by using its Last.fm tags. The most important new feature in the latest version (0.2.06) is Ubuntu Sound Menu support. This means the AppIndicator is no longer available but if you want it back, submit a bug and Filipe, the TagPlayer developer might add it back (as an optional feature).

Other features in the latest TagPlayer 0.2.06 are: multimedia keys support and a search box. Further more, TagPlayer is now faster and more stable.

The next release will probably bring multiple library locations but possibly other features too - if you want a feature in TagPlayer, submit a bug @ Launchpad and I'm sure Felipe will consider it and try to implement it (I've suggested 2 features and both were implemented). The same goes for any bugs you may find.

Install TagPlayer in Ubuntu

TagPlayer is available for Ubuntu 10.04, 10.10 and 11.04. Add the PPA and install TagPlayer using the following commands:
sudo add-apt-repository ppa:hikibi/tagplayer
sudo apt-get update
sudo apt-get install tagplayer

You can also download a TagPlayer .deb and manually install it - see the TagPlayer download page.

Senin, 21 Februari 2011

Touchpad-Indicator Now Automatically Disables The Touchpad When You Plug In A Mouse

Touchpad indicator


Touchpad Indicator was created with a very simple feature in mind: to allow you to easily enable / disable your laptop or netbook touchpad with a click but it slowly started gaining some other cool features. About two months ago, Touchpad Indicator got a nice feature that allows you to toggle the Touchpad on/off using a keyboard shortcut which is very useful for those that have issues with the Fn keys.

Today, Touchpad Indicator got yet another very interesting feature: it can automatically disable the touchpad when you plug in a mouse.

To use this new feature, you'll have to configure it first: click the Touchpad Indicator and select "Preferences", then click the "Configure" button - at this point you should see a window like this:

Touchpad Indicator - unplug mouse

You have to unplug your mouse (if connected) and click "OK". Then, another window will pop-up:

Touchpad indicator - plug mouse

Plug in your mouse and click OK. Once you do this, the configuration should be over (make sure the "Disable touchpad when mouse plugged" option is enabled!).

Install Touchpad Indicator in Ubuntu

Important: if you've previously installed Touchpad Indicator (or any other app from the Atreao PPAs), you need to add the PPA below as that is now the official PPA for all Atreao apps, including TouchPad Indicator, Picapy, My Weather Indicator and so on.

To add the Atareao PPA and install TouchPad Indicator, use the following commands:
sudo add-apt-repository ppa:atareao/atareao
sudo apt-get update
sudo apt-get install touchpad-indicator

In case you find any bugs, please report them to the Touchpad Indicator page @ Launchpad. You can also help translate Touchpad Indicator into your language.


Want more appindicators? Browse our appindicator tag.


Thanks to the TouchPad Indicator developer Lorenzo Carbonell @ atareao.es for the news!

Launchpad-Getkeys Gets Proxy Support [Automatically Import All Missing GPG Keys With One Command]

Launchpad Getkeys

Launchpad-Getkeys is a script (comes packaged in a .deb) that automatically imports all missing GPG keys, even if you're behind a firewall. It was initially created by blackgr @ ubuntuforums but then I decided to completely re-write the script so I can add some options, new features and so on.

How do you know when you have a missing GPG key? Here's an example: when you run "sudo apt-get update", you'll see some errors like this:

[...]
Fetched 47.0kB in 6s (7,710B/s)
Reading package lists... Done
W: GPG error: http://ppa.launchpad.net maverick Release: The following signatures couldn't be verified because the public key is not available: NO_PUBKEY B2DFD25316B94077
W: GPG error: http://ppa.launchpad.net maverick Release: The following signatures couldn't be verified because the public key is not available: NO_PUBKEY 1FFD34C9EB13C954
W: GPG error: http://ppa.launchpad.net maverick Release: The following signatures couldn't be verified because the public key is not available: NO_PUBKEY EF4186FE247510BE

Here's a screenshot too:

GPG errors


Further more, if you have missing GPG keys, the update manager will not allow you to update the packages. That's when Launchpad-Getkeys comes in: it can automatically import all these missing GPG keys, thus fix the errors.

Here is a video with Launchpad-getkeys in action to get a better idea on how it works:


Unfortunately my script didn't work if the user was behind a proxy but WebUpd8 reader Saurabh Kumar added proxy support to Launchpad-Getkeys - I couldn't test this (I'm not behind a proxy and even if I'd try to simulate this, I wouldn't know for sure that it works) but I've merged his change into the Launchpad-Getkeys package in the WebUpd8 PPA anyway. Read on to find out how to install and use Launchpad-Getkeys.


Install Launchpad-Getkeys


Launchpad-Getkeys is available for Ubuntu 9.10, 10.04, 10.10 and 11.04, in the WebUpd8 PPA. Add the PPA and install Launchpad-Getkeys using the following commands:
sudo add-apt-repository ppa:nilarimogard/webupd8
sudo apt-get update
sudo apt-get install launchpad-getkeys


How to use Launchpad-Getkeys


To automatically import all the missing Launchpad GPG keys, all you have to do is run the following command:
sudo launchpad-getkeys


You can also specify a keyserver and port using the "-k" parameter, like so:
sudo launchpad-getkeys -k SERVER:PORT

This is useful if the port is blocked (but Launchpad-Getkeys uses port 80 by default, unlike the "add-apt-repository" command until Ubuntu 11.04) or if the keyserver is down.

To use Launchpad Getkeys when you're behind a proxy (instructions by Saurabh Kumar - tested by him only), run the following command:
sudo visudo

Then search for this line:
Defaults        env_reset

And above it, add this:
Defaults env_keep = "http_proxy"

Then press "Ctrl + O" and "Ctrl + X" if visudo is open using Nano (that's the default behavior).

This will use your "http_proxy" so all you have to do is run:
sudo launchpad-getkeys

If you want, you can specify a different proxy like this:
sudo launchpad-getkeys -p http://SERVER:PORT


Note: There are still things to do. For instance, the script cannot tell if it imported the keys successfully or not and will always report this as successful. I'm still working on solving this.


Many thanks to Saurabh Kumar for his patch!

Unity Launcher Will Support Icon Resizing!

Well that was fast! Mark Shuttleworth has just posted a comment on the bug report regarding icon resizing support for the Unity launcher, saying:

Looks great! Thanks Andrea, let's get it into review and landing.

If you don't know what this is about, check out our previous post: Unity Launcher Gets Unofficial Patch To Allow Icon Resizing. But Will It Be Approved?

Unity Launcher Gets Unofficial Patch To Allow Icon Resizing. But Will It Be Approved?

Andrea Azzarone, who's also behind the menu integrated in the window titlebar Unity mockup we've posted last week has created a patch that provides an option to change the Unity launcher ("dock") icon size.

Check out this video featuring his actual code (not a mockup!):


Andrea wants to submit his patch on Launchpad, but unfortunately it looks like there are no plans to make the Unity launcher to be resizable: see this bug report. Further more, Mark Shuttleworth is against it:

Question: "Will the unity Launcher be resizable?" Mark Shuttleworth: No, the size and position of the Unity launcher are fixed. In future, they should respond to information we can discern on your preferred font sizes and screen size/resolution, but that's for a future date.

- from AskUbuntu; answer dating back to December 21st

Unfortunately, this seems to be yet another case in which the users will have to use a PPA to get the customization they want (like it is with customizable NotifyOSD). I'm really hoping a for at least a PPA that will provide this patch once Ubuntu 11.04 is out. But who knows, maybe they will reconsider this?


If you want the Unity launcher to get resizable icons, head over to THIS bug report and at the top you should see something like this: "This bug affects 8 people." Click it and select "Yes, it affects me". Like Jack suggest in a comment below, do not spam the bug report with useless comments, only use the "Yes it affects me" method as described above. This does not guarantee in any way that the Unity launcher will allow icon resizing, but it's worth a shot.

Update: it seems the patch will be accepted. See: Unity Launcher Will Support Icon Resizing!

Note: I couldn't find a link to download the patch for now.


What do you think? Is such a feature a must for the Unity launcher or is Mark Shuttleworth right?


Thanks to Diego Principe for the tip!
via ubuntusecrets.it (in Italian); Ayatana mailing list discussion

Displex Indicator Can Now Enable/Disable The Screensaver, More [Version 0.6, Released]

Displex Indicator

Displex is an appindicator initially designed to provide similar functionality to the well-known "fusion-icon", but using an Ubuntu Indicator. However, Displex progressed and now provides a lot more features: it can be used to control the window decorations, screen rotation through Xrandr, switch between Metacity or Compiz compositing, provides AcerHK support and more.

A new version of Displayex (0.6) was released today, this version bringing some menu enhancements like stock GTK icons and radio buttons for the options. There are also some new features: control verbosity of messages and a demo mode which you can use to see all the Displex menus (by default, the menus which your computer does not support such as Disper and AcerHK are disabled).

Also, since our last post on Displex, it got some very interesting new features: you can now use Displex to show/hide the wallpaper, activate/deactivate the screensaver and there's also a new submenu for controlling direction of screen extension.

Download Displex (includes .deb)

Haguichi (Hamachi GUI) Reaches Version 1.0.5

Haguichi 1.0.5

Haguichi, a GUI for Hamachi (including Hamachi2) has reached version 1.0.5. Here's the complete changelog:
  • Nickname is now being remembered by Haguichi itself and is always set after each login, because Hamachi² seems to suffer from amnesia.
  • Now using regular expressions instead of splitting strings when parsing the network list (Fixes bug #706567).
  • Now using separate threads for the following actions: change nickname, jJoin network, create network, change network password, approve join request, reject join request, evict member, leave network, delete network
  • Added notification for when Hamachi loses connection.
  • Added option to manually update the network list.
  • Added check to prevent multiple parallel update cycles.
  • Added one seconds pause after login to receive a more updated network list from Hamachi.
  • Added function to determine the distro specific script directory to use (Fixes bug #721314).
  • Dialogs to change nick, join network and create network are now only created when called upon.
  • Attached all dialogs to the opening parent and made most of them modal.
  • Changed status icon behavior to take account for modal dialogs.
  • Other minor fixes, improvements and optimizations.

As you probably know by now, we are maintaining the official Haguichi PPA so you can already install the latest Haguichi 1.0.5 in Ubuntu 10.04, 10.10 or 11.04 using the commands below:
sudo add-apt-repository ppa:webupd8team/haguichi
sudo apt-get update
sudo apt-get install haguichi

For other Linux distributions, check out the Haguichi download page.

If you encounter any bugs, report them @ Haguichi Launchpad page.

Thunderbird Indicator Adds Folders Support

Thunderbird Messaging Menu

Thunderbird Indicator is an add-on for Mozilla Thunderbird which notifies you of new mail messages via Ubuntu's standard notification system and the Messaging menu. Once a new mail is received, the Messaging menu's icon turns green and a notification pops up. The Indicator Applet also provides quick access to your contacts and allows you to compose a new message.

A while ago we were telling you about a PPA that provides a package called "xul-ext-indicator" that integrates Thunderbird in the Ubuntu Messaging Menu. This is actually a Thunderbird extension packaged in a .deb so you can easily get updates.

Until now, "xul-ext-indicator" (Thunderbird Indicator extension) displayed a notification (using the Messaging Menu and NotifyOSD) for emails that arrived in your inbox so if you used filters for your emails, the extension failed to work. But a recent update fixes this so Thunderbird Indicator can now display notifications for emails received in any folder. If you want the old behavior (to only display notifications for emails arriving in your inbox), there is an option in the Thunderbird Indicator preferences:

Thunderbird Indicator Preferences


To install Thunderbird Indicator in Ubuntu (the "fixed" version is only available for Ubuntu 11.04 for now), use the following commands:

sudo add-apt-repository ppa:ruben-verweij/thunderbird-indicator
sudo apt-get update
sudo apt-get install xul-ext-indicator libnotify-bin

The latest version is only avilable for Ubuntu 11.04. In Ubuntu 10.10, you can try to install the 11.04 package or download this .deb I've created for Ubuntu 10.10 last week (this is the one I'm using - ignore the version number, it's actually 1.4).


Thanks to Radu for the screenshot!

Minggu, 20 Februari 2011

Last 2 Weeks Top Posts (Weeks 6, 7 - 2011)

  1. GIMP Painter And GIMP Paint Studio Transform GIMP Into The Ultimate Painting Tool
  2. How To Boot An ISO With GRUB2 (The Easy Way!)
  3. DockBarX Applet 0.43 Released With Helpers, Media Buttons [PPA]
  4. Pinguy OS LTS Update: 10.04.2 [Ubuntu Remaster]
  5. Gnome Shell Gets Automatic Workspaces [Video]
  6. Evernote For Linux: Nevernote
  7. New ElementaryOS Video (Featuring Plank, Slingshot, Wingpanel, Postler, Dexter, Midori)
  8. Unity: The Systray Is Back, Themable Top Panel, Hide Animations, More [Ubuntu 11.04 Updates]
  9. Never Miss A NotifyOSD Notification With "Recent Notifications" GNOME Applet
  10. TeamViewer6 Stable For Android, Released [Remote Desktop Application]
  11. Play YouTube Videos Without Flash [From /tmp, Works With Adobe Flash 10.2]
  12. Unity Mockup: Menu Integrated In The Window Titlebar
  13. Auteur Is A New Non-Linear Video Editor For Linux

Get Your USB Drives To Work With VirtualBox (Ubuntu Host)

To get your USB drives to work with VirtualBox when using Ubuntu as a host, you need to add your user to the vboxusers group. Please note that this doesn't work with VirtualBox OSE, so you'll need to install VirtualBox 4.0.x from its repository.


To add your username to the vboxusers group in Ubuntu, go to System > Administration > Users and Groups, click on "Manage groups", scroll down to the "vboxusers" group and click "Propreties", then check the box next to your username and click OK:

VirtualBox usb drive

Then log out and log back in, plug in an USB stick (or whatever you may need), start a VirtualBox machine and select the USB device in the lower right. Using this, the USB device won't be accessible each time you start the VM.

To have an USB device available each time you start a VM, open VirtualBox, select a VM, click on "Settings" and on the USB tab, click the "+" icon on the right - this will display a list of your USB devices which you can add to your VM.


If you want to set up USB for VirtualBox manually, you can run the following command:
sudo gedit /etc/group

Then search for the "vboxusers" group and add your username to that line, like so:
vboxusers:x:125:andrei

"andrei" is my username - replace it with yours. Then save the file, log out and see above on how to add an USB drive to VirtualBox.

Sabtu, 19 Februari 2011

Set DockBarX To Use Compiz Scale Plugin (Unity-Like)

DockBarX Compiz Scale

I don't know how many of you know this, but DockBarX has a cool feature that allows you to trigger the Compiz Scale plugin when clicking on a window group. This is the effect used in Unity that you've seen in many videos - well, it this was available in DockBarX for a long time.

That means that you can already use this Unity dock feature without Unity. Check out the video below:


To set DockBarX to use the Compiz Scale plugin for a window group, open the DockBarX Preference and on the "Group Button" tab, under "Select action options", for "Multiple windows open" select "Compiz scale".

If you also want an Expo shortcut like in the video, check out this post: Gnome Panel Icon For Triggering The Compiz Expo Plugin (Like In Unity). To add the Expo shortcut to AWN, add the "Simple Launcher" applet, then drag'n'drop the Expo icon (which you've created like in the post linked above) to it.


Post inspired by arzali @ Ubuntuforums.

Jumat, 18 Februari 2011

Rescue Lost Partitions Data With GParted 0.8

GParted 0.8

GParted is a partition manager you can use to resize, copy or move partition without losing your data.

The latest GParted 0.8, released a couple of days ago, adds an option to rescue data from lost partitions: "This new feature uses the gpart command to guess the partition table. Discovered file systems can be mounted read-only so that you can copy data to other media". Bugs fixed in the new version include: fix paste destination partition smaller than source, prevent visual disk display area from disappearing and fix minor cylinder alignment rounding error. A complete changelog can be found HERE.


Install GParted 0.8 in Ubuntu


You can download GParted 0.8.0 .deb files below:
To be able to use the new rescue data for lost partitions feature, you also need a package called "gpart" which is available in the official Ubuntu repositories. Install it by clicking the button below:


(this will only install the gpart dependency, not GParted)

Or open a terminal and type the following:
sudo apt-get install gpart

Gparted is also available as a Live CD. The latest GParted Live 0.8.0-1 stable is based on the Debian Sid repository as of Feb 17, 2011 and you can download it from the GParted website.


Debs thanks to LFFL.org

Download "An Introduction to Debian Packaging" PDF Guide

An Introduction To Debian Packaging PDF

An Introduction to Debian Packaging is a PDF created by Lucas Nussbaum, designed to tell you what you really need to know about Debian packaging, keeping a resonable size. The guide doesn't attempt to be complete but it's great if you want to start making your own .deb files or simply understand how the Debian packaging works.

Note: If you're using Chrome to open the PDF, the text is not readable because of the background. Download the PDF and open it in a PDF viewer instead and the font will look ok (or use Google Docs).

Download "An Introduction to Debian Packaging" PDF | Open the PDF with Google Docs.

For the full Debian packaging documentation, refer to The Debian New Maintainers' Guide or the Debian Policy Manual. There's also a small how-to on this available on WebUpd8: How To Create A .DEB Package [Ubuntu / Debian] (it's pretty basic but should be enough to get you started).

Recent Notifications Applet Can Now Blacklist Applications

Recent Notifications applet

Recent Notifications is a GNOME applet that collects recent messages sent with libnotifiy to a notification daemon, such as notify-osd.

Just one day after we wrote about the Recent Notifications applet, it got a cool new feature but we never got to write about it because of the many news that came up this week.

The feature I'm talking about is an option to blacklist applications within the applet. For example if you get a lot of notifications in Pidgin, simply right click a Pidgin notification in Recent Notifications and select "Blacklist Pidgin" - the same goes for any application. If you want to remove an application from the blacklist, right click the Recent Notifications applet and uncheck the app you want to remove from the "Blacklist" tab:

Recent notifications applet

But that's not all; the applet got no less then 8 updates since our post last week. Most of them were bug fixes, but there are also a few other minor features that were introduced, like debug messages or set the message limit.

If you didn't try Recent Notifications applet already, you really should! Add the Recent Notifications PPA and install the applet in Ubuntu using the following commands:
sudo add-apt-repository ppa:jconti/recent-notifications
sudo apt-get update
sudo apt-get install recent-notifications

Kamis, 17 Februari 2011

Unity: The Systray Is Back, Themable Top Panel, Hide Animations, More [Ubuntu 11.04 Updates]

The Ubuntu devs really like to push updates at night but luckily I'm usually awake when that happens so I can tell you what's new in Unity as soon as the updates are released.

A new Unity version was released a few minutes ago with some exciting new features. New for Ubuntu 11.04 I mean, because they are something that's always been around in Gnome but not available or removed in Ubuntu 11.04 / Unity.


The systray is back! But it's different.


The biggest change is the addition of a systray (notification area) to the Unity top panel:

Unity Ubuntu 11.04 screenshots

Even though the systray was supposed to be removed in Unity, it's back! But not back for all the applications: only Java and Wine applications can use the new systray. Besides these apps, Skype can also use it thanks to a request by Mark Shuttleworth.

But that's not all that's different in the new systray (I guess it's ok to call it a systray now that it's more of a Wine thing): unlike the previous systray, this area is not movable, manually resizable, or removable.


Unity top panel respects the GTK theme style


Another important change came to the Unity top panel which now respects the GTK theme style:

Unity Ubuntu 11.04 screenshots

Ubuntu 11.04 unity screenshots


Further more, you can now set the panel opacity:

Unity Ubuntu 11.04 screenshots


More!


And there's also a new keyboard shortcut to open the first panel menu as well as a shortcut to put keyboard focus on the panel:

Unity Ubuntu 11.04 screenshot


The Unity launcher ("dock") was also updated, getting hide animations: fade and slide, slide only and fade only:

Unity Ubuntu 11.04 screenshots


Some other changes came in last week's Unity update but we didn't post about it because it wasn't much to talk about. I'll add the info to this post: Unity got the old autohide behavior back, as well as intellihide settings to either dodge windows or dodge the active window only:

Unity autohide settings


Unity video


You can see all these new changes in the video below:


For more Unity (and not only) videos, follow WebUpd8 on YouTube and Facebook.


Check out all the Ubuntu 11.04 Natty Narwhal updates.