

VirtualBox 4.0 has been released today. We've already covered what's new in VirtualBox 4.0.x when the first beta came out so check out that post or the changelog for more info.
As you probably know, starting with VirtualBox 4.0.x some features are now available separately, in an extension pack. Here are the step-by-step instructions on installing both VirtualBox and the Extensions Pack in Ubuntu.
Install VirtualBox 4.0 in Ubuntu
1. Remove any previous VirtualBox version you had installed.
Presuming you were using version 3.2, you would have to run the following command:
sudo apt-get remove virtualbox-3.22. Add the VirtualBox contrib repository and install VirtualBox 4.0.x (currently 4.0.4):
VirtualBox 4.0.x (currently 4.0.4) is no longer available in the non-free component of the VirtualBox Ubuntu repository but in contrib.
Add it and install VirtualBox using the following commands:
sudo -v
echo "deb http://download.virtualbox.org/virtualbox/debian $(lsb_release -sc) contrib" | sudo tee -a /etc/apt/sources.list
wget -q http://download.virtualbox.org/virtualbox/debian/oracle_vbox.asc -O- | sudo apt-key add -
sudo apt-get update
sudo apt-get install virtualbox-4.0
3. Download the Extension Pack.
For USB 2.0 devices, VirtualBox RDP and PXE boot for Intel cards support, you'll also have to install an Extension pack which you can download from HERE.
4. Install the VirtualBox Extension pack.
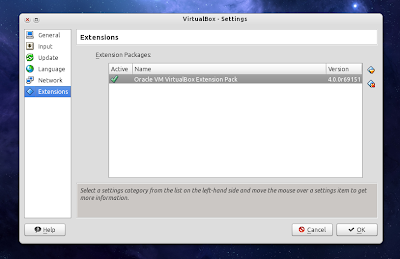
Open VirtualBox 4.0.x and go to File > Preferences and on the Extensions tab, click the "add" button on the right (first blue diamond) and browse for the VirtualBox extension pack you've downloaded in step 1. That's it!
Thanks to gericom for the Contrib repository tip!


Tidak ada komentar:
Posting Komentar