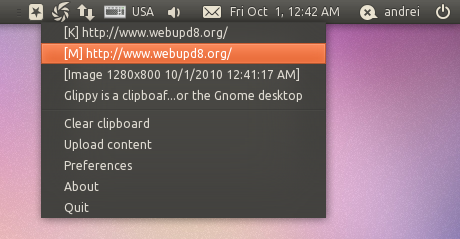
Glippy is a clipboard manager for the Gnome desktop. Some of its main features are: Ubuntu appindicator support, it can store test from both keyboard and mouse (select some text using your mouse and it will be available in Glippy), you can easily access the keboard using a hotkey (CTRL + SUPER + C by default, but it can be customized).
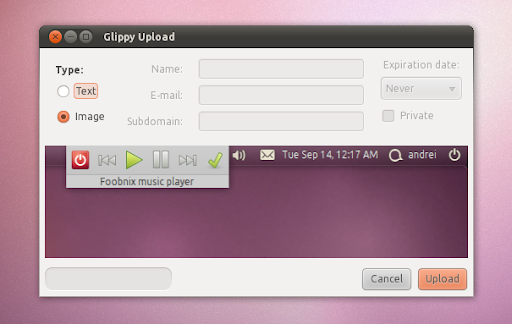
A while back, Glippy got an option to upload the stored text to PasteBin and Image clips to Imgur. But back then, it only worked for special GTK image clipboard, used for example in GIMP or when selecting part of image or "Copy image" in Firefox/Opera. But starting today, this was further improved and you can now copy any image from your computer and select "Copy" (in Nautilus for example) and you'll then be able to upload it to Imgur via Glippy.
Install Glippy in Ubuntu
To add the Glippy PPA and install it in Ubuntu (10.04 and 10.10 only!), run the following commands in a terminal:
The Glippy PPA also provides Ubuntu monochrome icons so Glippy will integrate perfectly with the Ubuntu desktop (default icon theme). Install the Glippy Ubuntu Mono icons using the following command:
CLI Companion is a tool aimed at making the terminal easier to use: it's a GUI that displays a list of commands and an embedded terminal under it. The application comes with a list of commonly used commands by default, each having a short description and if you want to find out more about a certain command, simply right click it and select "Help". This will display the "man" (manual) for the selected command.
You can of course add your own commands to CLI Companion: simply click the "Add" button, then enter your command, an argument (optional) and a description.
To run a command, you just have to select it and click "Apply" and you'll see the output in the embedded terminal. If the command requires an argument, it will prompt you - all using a GUI. You can also run multiple commands in the same time: click the "+" sign on the right and a new tab will open.
Advanced users may also find Cli Companion useful by storing custom commands they came across for easier access and since CliCompanion has a built-in search tool, those commands will be easy to find and run.
Install / download CLI Companion
CLI Companion comes with an Ubuntu PPA so you can easily stay up to date with new releases:
If you don't want to use the PPA you can simply download this .deb - it should work on any Debian based Linux distribution.
We received this tip so many times we just had to write about CliCompanion. Well, we would have written about CliCompanion anyway but as some point I forgot about it. Thanks to Matthew Byers, dart, Greg, eMcE and everybody else who mentioned it in the comments!
A recent update in Ubuntu 10.10 Maverick Meerkat (it probably didn't reach the users yet) sets the Ubuntu font as the default Application, Window title, and Desktop font for Ubuntu 10.10:
ubuntu-artwork (53.7) maverick; urgency=low
* debian/gconf-defaults - Set default Application, Window title, and Desktop fonts to "Ubuntu"
The default font size will be set to 11 (instead of 10).
For now, the font has only been set as default for the Ubuntu Desktop edition; Kubuntu will not be getting the Ubuntu font by default and regarding the Ubuntu Netbook Edition (or the other Ubuntu flavors), no info is available at this time.
Ubuntu 10.10 Release Candidate has just been released. There aren't too many visual changes since the beta version (most of the visual changes happened before the beta so see THIS post), but there are a few things worth mentioning. Read on to see what's new in Ubuntu 10.10 Release Candidate (since Ubuntu 10.10 beta)!
New installer slideshow
Ubuntu 10.10 Maverick Meerkat will be released with a completely revamped installer. We've already seen the new features and basic look a while back, but the slideshow has been updated recently so I've recorded a video for the whole Ubuntu 10.10 installation process, which you can watch below:
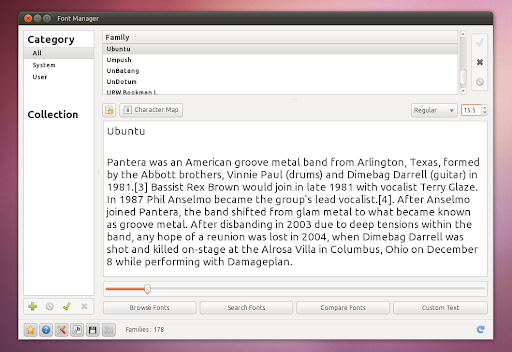
The new Ubuntu font is now shipped with Ubuntu (all the flavors) but has not been set as the default font, at least not for now. You can see the new font throughout all the screenshots in this post, but here is also a larger screenshot:
The Ubuntu Font Family has been released as a Libre font, licensed under the Ubuntu Font Licence 1.0:
Canonical are working with SFLC and SIL on a revision of the OFL with the intent of adopting that revision for a future version of the Ubuntu Font Family. This Ubuntu Font Licence serves as an interim licence until that is complete.
The default theme - Ambiance, as well as it's lighter version - Radiance, received an update since the beta and while the new version doesn't bring any major changes, it fixes a lot of issues: you can now resize the windows easily by dragging the bottom right corner, the disabled menu items text readability has been improved and the menus should now be faster (although there's still a small issue with this yet).
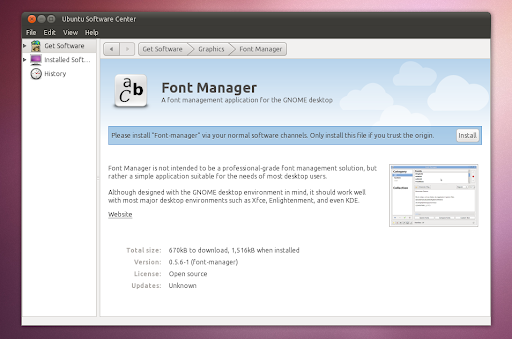
Ubuntu Software Center Now Handles .deb file installation
Ubuntu Software Center reached version 3.0.2 and it has replaced gdebi for installing .deb files. That means that now when you double click a .deb file, it will open the Ubuntu Software Center and you can install it from there. When this happens, a warning message is displayed in the Software Center: "Please install X via your normal software channels. Only install this file if you trust the origin".
Sound Menu
The Sound Menu was further improved and it should now respect your current theme colors:
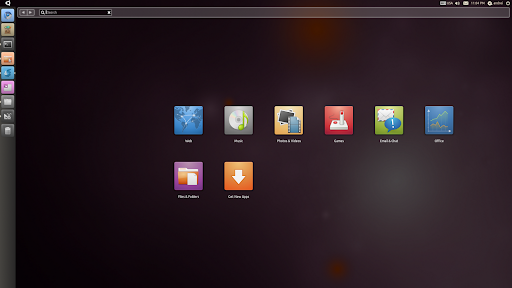
New default wallpaper
Back when Ubuntu 10.10 Maverick Meerkat Beta was released it already had a new default wallpaper. But because the users didn't like it, it was changed with a new wallpaper which you can see in the image above. Besides the new default wallpaper, the Maverick update also brought a bundle of all the community wallpapers as an animated wallpaper.
Ubuntu Extras repository is live
The new Ubuntu Extras repository is now live and should be added by default. This repository was built to hold completely new applications so users don't have to wait for a new Ubuntu version to install an application which just came out. Please note that this repository will not hold updated versions of the applications already in the Ubuntu repositories! More info about this: New Ubuntu "Extras" Repository Is Now Live
Software Sources disabled from the System menu
Software Sources has been removed from the System > Administration menu. It can still be accessed from the Ubuntu Software Center or Synaptic Package Manager and you can also re-enable it (right click the System menu, select "Edit menus" and then scroll down to Administration and check the box next to "Software Sources") but it's not available in the menu by default anymore.
Ubuntu 10.10 Netbook Edition Release Candidate
The Ubuntu 10.10 Netbook Edition Release Candidate (Unity & Co.) doesn't bring any visual changes at all (compared to Beta) and while ever since Ubuntu 10.10 beta was released it worked just fine, after some updates from a few days ago, UNE started freezing again so it's not usable at the time I'm writing this. Hopefully everything will be fixed soon.
Can / should I upgrade to Ubuntu 10.10 already?
I've been using Ubuntu 10.10 for some time now and for the past few weeks everything has been stable. Also, if when the beta was released I couldn't enable the desktop effects (I'm using an Nvidia graphics card), now this finally works (it has for some time). Also, the bug which didn't allow you to installed .deb files has been fixed so that's out of the way too and most of the crashes I was experiencing when the beta was released, are now gone.
If you're using an ATI graphics card, WebUpd8 reader Tamás Nagy sent us a tip a few days ago telling us that FGLRX finally works with Ubuntu 10.10 (Xorg 1.9 and 2.6.35/6 kernel) so if you're using FGLRX you can finally enable the desktop effects and actually boot without getting a blank screen.
About the Ubuntu 10.10 Netbook Edition Release Candidate: the story is the same as it was with the beta version: while it was usable at some point, it's not anymore and everything crashes and freezes so I advice against installing / upgrading UNE 10.10 for now.
Disclaimer: things might work differently for you. The above notes might strictly apply to my hardware.
How to upgrade to Ubuntu 10.10
If you've installed any of the alphas or the beta version of Ubuntu 10.10 and constantly installed the updates that come through the Update Manager, you are already using the Ubuntu 10.10 Maverick Meerkat Release Candidate.
If you're running an older Ubuntu version (10.04, 9.10 and so on), to upgrade to the latest Ubuntu 10.10 Maverick Meerkat RC, all you have to do is press ALT + F2 and type:
update-manager -d
Then follow the instructions on the screen.
Download Ubuntu 10.10 Maverick Meerkat RC
You can download Ubuntu 10.10 Maverick Meerkat Release Candidate at the following address: http://releases.ubuntu.com/maverick/ (it includes Ubuntu Desktop and alternate CD - both 32bit and 64bit as well as Ubuntu Netbook Edition).
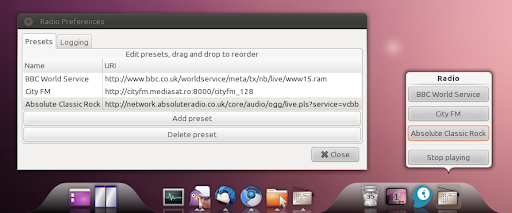
If you want to play a radio stream in the background without having to open a separate application for this, you can use AWN Radio, an unobtrusive AWN applet which sits in your Avant Window Navigator dock and can play a radio stream of your choice in just 2 clicks.
AWN Radio Applet is as minimalistic as it gets: you only get the list of radio streams you've added and a stop button. The preferences dialog only allows you to add radio streams and logs the radios stations you're listening to.
Because AWN Radio Applet uses Mplayer as its back-end, it supports all the formats that work with Mplayer.
Install AWN Radio Applet in Ubuntu (9.10, 10.04 and 10.10):
Note: I've only tested it with AWN 0.4.1+ from the AWN testing PPA!
If you're not using Ubuntu, you can grab the AWN Radio Applet source code from Launchpad.
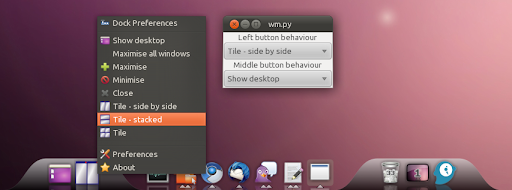
AWN Radio Applet has been created Bryan Blunt who's also behind the AWN Window Manager Applet. And speaking about the AWN Window Manager, a lot of changes were made to this new applet last night and among the changes there's also a fix for the icon size so now the applet should respect your AWN icon size. Also, the plugin will now show up as "Window Manager" in the AWN applets list (instead of "Tile windows"). The new version has been uploaded to the WebUpd8 PPA. Instructions on installing it: AWN Window Manager (Tile) - New Avant Window Navigator Applet.
KDE4 users will be glad to know that the gorgeous Faenza icons theme has been ported to KDE4. Unfortunately since this pack is not supported by Thieum (the original Faenza icon theme author), the package is not available in the Equinox PPA - but that shouldn't be such a big issue since the icons are very easy to install.
Music Player Daemon (MPD) is a server-side application for playing music. Through plugins and libraries it can play a variety of sound files while being controlled by its network protocol. There are many MPD clients and if you want all the features you can imagine in a music player and the lightest solution for this you should give MPD + GMPC a try.
Adding MPD (and thus any MPD client) to the Ubuntu 10.10 Sound Menu is very easy thanks to Vsevolod Velichko who maintains a PPA for a package he created to add MPD to the Sound Menu.
The MPD Sound Menu integration is still very basic at this point but what's most important: it works! Here are some notes from the author:
It will only work if your music is in (or linked to) /var/lib/mpd/music. In other cases it'll work in sound-menu, but it'll break MPRIS.
For now you must start the application from the terminal (the first time only)
Vsevolod hopes he'll be able to make it reconnect MPD and be able to restart MPD from the sound menu as well as make the music library configurable but for now these are not available.
To install the MPD Sound Menu integration, use the following commands (for Ubuntu 10.10 Maverick Meerkat only - obviously since the menu has just been released in Maverick):
AWN Window Manager (also known as Tile Windows) is a new Avant Window Navigator applet which can be used to tile (side-by-side, staked or grid) or maximize all windows (as well as the usual minimize/maximize/close/show desktop actions) and comes with a preferences dialog where you can set the default left / middle click behavior.
Because I find it to be an extremely useful AWN applet, I've used Hadret's debianization of the DockBarX AWN applet for AWN Window Manager and uploaded it to the WebUpd8 PPA so you can easily install it in Ubuntu (9.10, 10.04 and 10.10). Before installing, please note that while in theory the applet should work with Avant Window Navigator 0.4, I've only tested it with Avant Window Manager 0.4.1+ from the AWN PPA (installation instructions HERE).
To install AWN Window Manager in Ubuntu, use the following commands in a terminal:
If you don't want to add the PPA, you can manually download the deb:awn-applet-wm_0.5-1~webupd8~maverick2_all.deb (8.2 KiB) (don't worry about "maverick" in the version name, it will work on any Ubuntu version where AWN 0.4 or 0.4.1 is installed).
Once installed, go to the Avant Window Manager Preferences and on the "Applets" tab, scroll down to the "Window Manager" applet and activate it.
I've discovered a small but annoying bug in AWN Window Manager but which can easily be fixed. If you're using a size different then "48" for your Avant Window Navigator icons, AWN Window Manager will still have a size of 48. This bug has been fixed in the latest version - already available in the PPA.
If you're not using Ubuntu, you can grab the AWN Window Manager Applet source code from Launchpad.
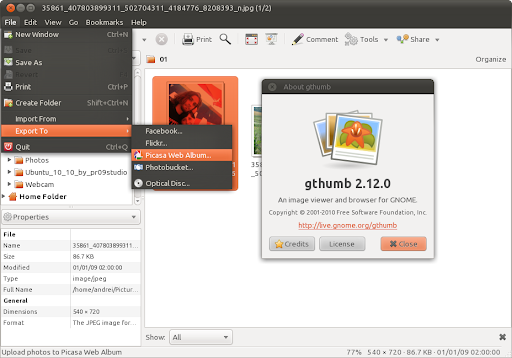
gThumb is an image viewer and browser utility for the GNOME environment.
Finally, after a long period of development, a new stable gThumb version has been released: 2.12.0. We've been following the gThumb development here at WebUpd8 so you should already be up to date with all the changes. To mention just a few new features since the last stable version (not development!): Facebook, Flickr, PicasaWeb and Photobucket export, import from Flickr and PicasaWeb, gThumb can now play videos and many many other new features and improvements which I'll not cover since we already talked about all of them throughout the gThumb 2.12 development posts (gThumb 2.11.x was the development branch for gThumb 2.12). You can read all about the gThumb 2.12.0 new features by browsing our gThumb posts.
Install gThumb 2.12.0 in Ubuntu
gThumb 2.12 is not available in the Ubuntu 10.10 official repositories (I'm not sure if the final version will be available), not to mention Ubuntu 10.04 but we maintain a PPA just for gThumb so you can easily install it in Ubuntu 10.04 and 10.10:
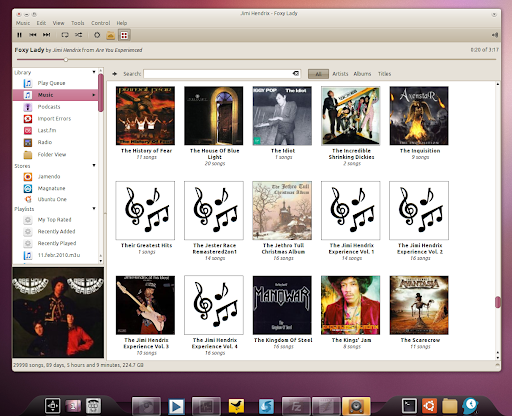
RhythmArty is a Rhythmbox plugin that allows you to browse your music collection via album art. I didn't post about it until now because it initially (versions 0.1 and 0.2) crashed my Rhythmbox (you can see comments related to this here) and then when version 0.3 was released it did work but it was very slow with my ~30.000 files music collection.
But today, RhythmArty 0.4 was released which not only fixes the crashes but is also very fast and works great with large music collections. Besides the performance improvements, the new RhythmArty also got a new option to fetch the missing cover art (Tools > Get Covers).
The current RhythmArty features include option to customize the colors, set the cover art size and easily toggle it on/off via a button on the Rhythmbox toolbar.
One annoyance in RhythmArty, at least for me is that a lot of albums don't have cover art so the standard RhythmArty cover is used. One way this could be improved would be to use some artist picture instead of the album covers in such cases.
To use Firefox Elementary 2.0, download the installation script from DeviantArt, extract and double click the "Install.sh" script, then select "Run in terminal". When asked, select if you want to use it with tabs on top or on bottom.
For the menu, you can use an extension such as Personal Menu.
Unfortunately Firefox Elementary (either 1.0 or 2.0) does not support Firefox 4.0!
The new Ubuntu font ("Ubuntu Font Family") has just been uploaded to the Ubuntu 10.10 Maverick Meerkat official repositories and is now shipped with both Ubuntu desktop and netbook editions according to the Ubuntu meta and Netbook meta changelogs:
Refreshed dependencies * Added ttf-ubuntu-font-family to desktop
The font however is not used by default on any Ubuntu flavor! As bug 649616points out, the decision on making this the default font for Ubuntu 10.10 has not been taken yet.
Licence
The Ubuntu Font Family has been released as a Libre font, licensed under the Ubuntu Font Licence 1.0:
Canonical are working with SFLC and SIL on a revision of the OFL with the intent of adopting that revision for a future version of the Ubuntu Font Family. This Ubuntu Font Licence serves as an interim licence until that is complete. Source
That's because the license still needs some clarifications.
How to download / install the Ubuntu font
If you're using Ubuntu 10.10 all you have to do is run an upgrade and the new Ubuntu font should be installed with the updates. Alternatively, you can install the font using the following command:
sudo apt-get install ttf-ubuntu-font-family
If you're not using Ubuntu 10.10 Maverick Meerkat, you can download the Ubuntu Font Family as an archive or deb from HERE although the recommended way of getting the font is through the official PPA (still private, hopefully it will be made public soon) so you can get updates!
There's still work to be done!
The font is not ready for all the languages and there are missing glyphs for Arabic, Armenian, Georgian to name just a few. In case this will be made the default Ubuntu 10.10 font in the final release, the old font will be used for these languages. As a side note, the font name has been changed from "UbuntuBeta" to "Ubuntu" which means the font is no longer considered beta.
The Ubuntu Font Family will also be made available as a webfont which you'll be able to use on your website. It is considered to make it available on both http://font.ubuntu.com and on Google's Webfonts directory: http://code.google.com/webfonts
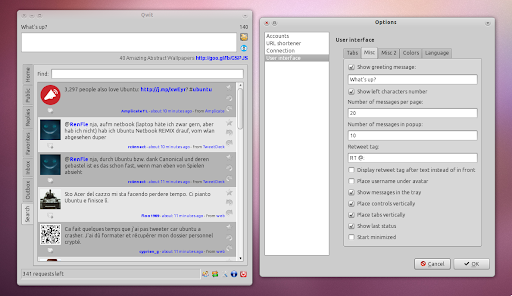
Qwit is a cross-platform (works on Windows and Linux - any desktop environment) Twitter / Identi.ca client written in Qt4. The application was recently updated (currently version 1.1 pre 2) to support OAuth and comes with http-proxy support, customizable interface, Twitpic support, a lot of URL shorteners, multiple accounts support and other features.
What's interesting about this Twitter client is that you can customize which tabs refresh automatically and which manually and you can of course also specify the update interval. Also, Qwit integrates well with both Gnome and KDE and can use libnotify, kdialog or Qt notifications.
Thanks to Roberto @ LFFL, you can easily install Qwit in Ubuntu (even tough the package name says "lucid", it also works in Ubuntu 10.10 Maverick Meerkat) using .deb packages:
Note: after installing Qwit, don't enter your Twitter username and password - that won't work (it doesn't work with any Twitter client anymore unless it uses SuperTweet). Instead, click the "Authorize" button under "OAuth", then follow the instructions.
You can also find Windows packages for the latest Qwit 1.1 pre 2 @ Qwit homepage (not download page!). Or you can compile Qwit yourself.
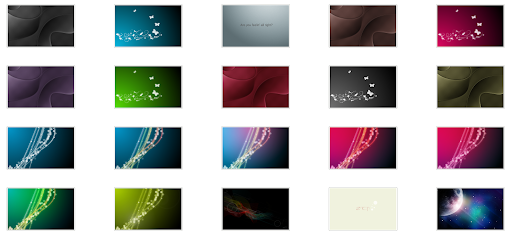
(Only a few of the pr09studio wallpapers - using different colors)
The guys at pr09studio have an amazing abstract wallpaper collection which you can check out here. Some are Ubuntu / Linux / Gnome / KDE branded but there are also unbranded wallpapers (yes, I know, some of you don't like branded wallpapers).
If you don't like the default color for some wallpapers, you should download the archive anyway since some of them come in lots of different colors (like you can see in the screenshot above).
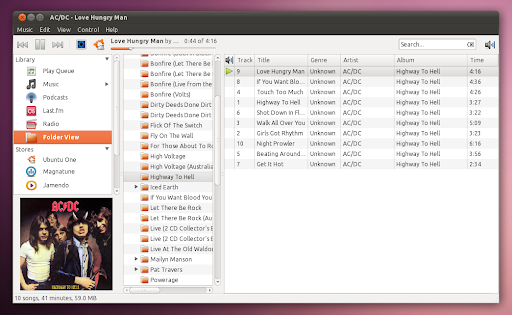
I've recently discovered a new Rhythmbox plugin called FolderView. Like the name suggests, this plugin allows you to browse the music in Rhythmbox by folders.
Unfortunately the plugin doesn't work like I would have expected: it only allows you to browse the music already in the Rhythmbox database. So if you don't want to add your music to the Rhythmbox library, you can't use this plugin to simply browse the music by folders like it is with Exaile for instance.
Even so, the plugin is very useful if your music collection is well organized in case of folder structure (by artist / album / genre or whatever). For example, if your music is not tagged or badly tagged, Rhythmbox won't be of too much help in finding the music you want to play but with FolderView, you should easily be able to find any track you want to listen to (of course, you need a decent folder structure for that). Another use for FolderView is when you don't remember a song name but you know the folder it's in or simply want to listen for some music in a certain directory.
Installation
Update: WebUpd8 reader zedtux has created a PPA for FolderView so you can install it in Ubuntu 9.10, 10.04 and 10.10 using the following commands:
For manual installation (don't worry, you don't have to compile anything!) which works on any Ubuntu version or Linux distribution, do the following:
1. You'll need SVN to be able to download FolderView so install that first:
sudo apt-get install subversion
2. Then install the plugin:
mkdir -p ~/.gnome2/rhythmbox/plugins/ #in case it doesn't exists already
cd ~/.gnome2/rhythmbox/plugins/
svn checkout http://folderview.googlecode.com/svn/trunk/ folderview
Then simply start Rhythmbox, go to Edit > Plugins and enable FolderView.
When I first discovered this plugin, it didn't work with Rhythmbox 0.13.1. The bug has now been fixed but there is still one small bug that needs fixing: if you're playing a song and pause it, when changing folders, Rhythmbox will start playing the first song in that new folder. It's not a big issue, but still a bit annoying. Must have something to do with the fact that Rhythmbox does not have a stop button. Hopefully this bug will be fixed soon (I've already reported it).
Note: I've tested the plugin with Rhythmbox 0.13.1 only (on both Ubuntu 10.04 and 10.10)!
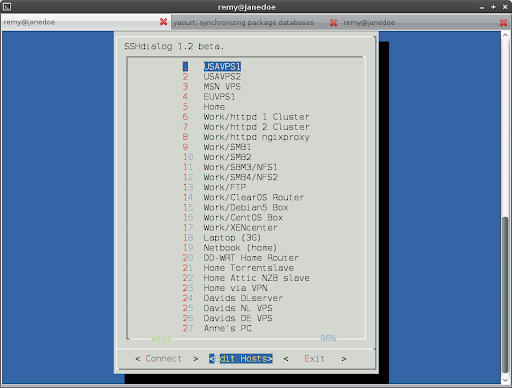
It seems we're having a scripts week here, at WebUpd8. Remy sent us a script he wrote to easily manage a lot of servers through SSH. You can find the script and instructions on using it @ Raymii.org.
Usually to share a file using Dropbox, you have to manually copy it into the Dropbox public folder, then when it's uploaded you have to right click it and select Dropbox > Copy Public Link. Here is a tiny Nautilus script which allows you to right click any file from your computer (so it doesn't have to be in your Dropbox public folder) and instantly get a Dropbox public link so you can easily share it.
What the script does is create a symbolic link to the file (or files - it works with multiple files at once too) you've selected and place that link into your Dropbox Public folder. Once the file has been uploaded to Dropbox, the public link is copied to your clipboard using xclip (a command line clipboard utility) so all you have to do is paste the link in an email, IM window or whatever.
Also, since it only creates a symbolic link to the file, you don't use the double amount of space for that file.
Sounds complicated? Well, it's not. Here's is a video with this script in action:
Now you're ready to use it: right click any file(s) and select Scripts > Dropbox Share. Then in a browser tab, select "Paste" - the public link of the file you've selected should now be ready for sharing. Of course, you'll have to wait a bit for the file to be synchronized with Dropbox.
Note: the script works on multiple files but does not work on folders - it will create links for them in your Dropbox public folder and even copy the folder share link but entering the link in a browser will result in a "404 not found" error since Dropbox does not allow folder sharing! There is however a way to share folders with Dropbox. See: Share An Entire Dropbox Folder With Dropbox-Index.
Update: initially the script didn't support spaces in filenames. Now it does.
Optional: Unshare Script
Update2: Nicolas @ Nicolargo blog has created an Unshare script which is basically like the Dropbox Share script, but can be used to right click any file on your system and select Scripts > "Dropbox Unshare" and the symbolic link will be removed from your Dropbox public folder. To install it, use the following command:
gedit ~/.gnome2/nautilus-scripts/Dropbox\ UnShare
And paste this:
#!/bin/bash

LOCATION="`cat ~/.dropbox/host.db | sed -n 2p | base64 -d`/Public/"

IFS=$'\n'
for FILENAME in $NAUTILUS_SCRIPT_SELECTED_FILE_PATHS
do
       DROPBOXFILE=`echo $FILENAME | awk -F/ '{print $NF}'`
       rm -f "$LOCATION"/"$DROPBOXFILE"
       list="$list $LOCATION/$DROPBOXFILE"
done
zenity --info --title="UnShared from Dropbox" --text="The following file have been unshared:\n\n"$list"\n"
And finally, also make sure you have Zenity installed as this unshare script needs it (though you can remove Zenity by deleting the last line in the UnShare script):
There are 2 applications you can use to see which DNS is the fastest for you (Namebench and Domain Name Speed Benchmark) but for a quick way to do this (without actually setting your computer to use new DNS), you can use the following command:
x=0; server=8.8.8.8; host="yahoo.com"; queries=128; for i in `seq $queries`; do let x+=`dig @${server} $host | grep "Query time" | cut -f 4 -d " "`; done && echo "scale=3;($x/${queries})" | bc
The command uses "dig" (which you can install in Ubuntu/Debian with: sudo apt-get install dnsutils) and you can specify the server (DNS to test), host (I've used Yahoo but you can use any other website) and number of queries (the number of requests).
In the above example, 8.8.8.8 is one of the Google DNS (the other one is 8.8.4.4). You can replace it with other DNS to test their speed (like OpenDNS: 208.67.222.222 and 208.67.220.220 or your ISP DNS and so on).
For me, Google DNS was a lot faster (13.351) then OpenDNS (49.460). But then again, Google already knows almost everything about us, so should we use its DNS services too?
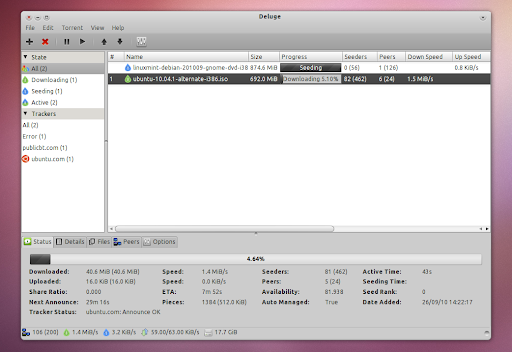
Deluge is a Linux and Windows Bittorrent client which uses multiple interfaces: GTK+, web and console. Read more about it @ Deluge homepage.
Deluge 1.3.0 was released about a week ago bringing a lot of changes to the WebUI which now handles a large amount of torrents better (among other improvements). The GTKUI was also tweaked to handle a large number of torrents better by adding a client-side cache to reduce the RPC traffic. The Deluge developers say the GTKUI is now using 20% of the bandwith the 1.2 client was using.
Deluge 1.3.0 also comes with 2 new plugins: AutoAdd (allows for an unlimited amount of watch folders and for providing options for torrents added for those folders) and a new notifications plugin.
Install Deluge 1.3.0 in Ubuntu
Deluge 1.3.0 is available in the Ubuntu 10.10 Maverick Meerkat official repositories so you can install it by searching for Deluge in the Ubuntu Software Center.
Ubuntu 10.04 Lucid Lynx users are probably waiting for the Deluge PPA to be updated but it doesn't look like it will be updated anytime soon. Deluge 1.3.0 is available @ GetDeb but here's there is an issue too: GetDeb is down at the time I'm writing this post. But there is an GetDeb Mirror you can use. Add this GetDeb mirror using the following commands:
echo "deb http://mirrors.dotsrc.org/getdeb/ubuntu lucid-getdeb apps" | sudo tee -a /etc/apt/sources.list
echo "deb-src http://mirrors.dotsrc.org/getdeb/ubuntu lucid-getdeb apps" | sudo tee -a /etc/apt/sources.list
sudo apt-key adv --recv-keys --keyserver pgp.mit.edu 46D7E7CF
Then you should be able to install the latest Deluge 1.3.0 in Ubuntu 10.04 Lucid Lynx:
Note: while testing Deluge 1.3.0 (both the official version in Ubuntu 10.10 and the GetDeb version in Ubuntu 10.04), when trying to quit via File > Quit, Deluge was not closing and instead it freezes. It seems there's a bug upstream since it occurred in using 2 different builds (or maybe there's something on my system which causes this). This however did not happen when I've selected "Quit" via the notification area icon (weird...).
SparkleShare is a syncing tool similar to Dropbox but which allows you to use your own server (or some already existing servers). It uses GIT so if you delete/modify some files by accident, you can easily revert the changes.
The good
SparkleShare has quite a few interesting features / reasons to use it. Obviously the most important one is that you can use it with your own server. Also, it will be available for Linux, Windows and Mac OSX.
If you don't want to set up your own server, SparkleShare can be used with Github and Gitorious. These are project hosting solutions that provide free space if you work on Free and Open Source Software projects. Note that using these 2 services, all your synced files will be public!
The bad
- It uses Mono. That's an enough reason for a lot of people not to use it.
- Currently, hosting your own SparkleServer is a bit difficult.
- The files hosted on Github and Gitorious can be accessed by anyone.
- And probably most importantly: GIT is not a good binary storage solution. So if for example you want to store some movies from your holiday or mp3 files, it will at least double the space required for the files (one for the actual file and one copy in the .git directory).
Install SparkleShare (client) in Ubuntu
The installation instructions are for installing the client for use with Gitorious and Github.
1. Download
SparkleShare is still beta. You can download the latest beta from HERE (0.2 beta 1) or get the latest code via Gitorious.
2. Install the dependencies required to compile and run SparkleShare
I'll cover the SparkleShare 0.2 beta 1 installation (the difference with getting the code from Git is that you must use ./autogen.sh instead of ./configure): once you've downloaded and extracted the archive, navigate to the folder where you've extracted SparkleShare and run:
./autogen.sh
./configure --prefix=/usr
make
sudo make install
If you later want to uninstall it, simply navigate again to this folder and run "sudo make uninstall".
Now everything has been set up and you can run SparkleShare via the Applications > Internet > SparkleShare menu item.
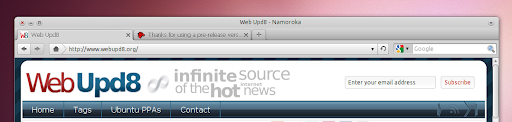
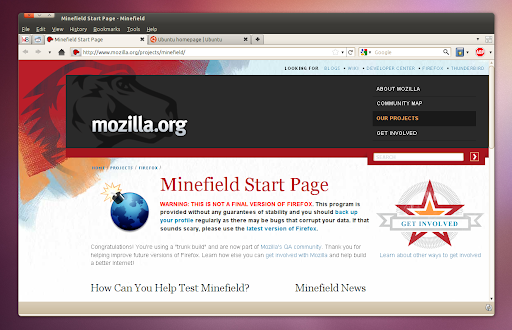
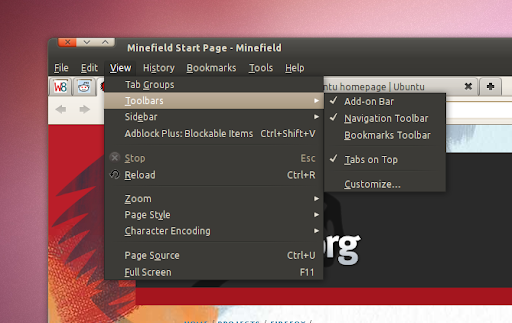
Just when I though Firefox 4 is finally coming together, the latest Firefox 4 nightly brings a so called "Add-on bar" which is just like the old statusbar which Mozilla has been trying to deprecate with the recent changes (links and progress bar in the location bar), only bigger.
If you think it might look so big because of the theme (I though so too), you'll notice it's just as big using the default Ubuntu theme (just make sure you add something to it as it's smaller when empty). Fortunately, in the same update the old statusbar was completely removed and this new Add-on Bar doesn't come enabled by default.
If you want to enable it in Firefox 4 (lastest nightly build), simply go to View > Toolbars > Add-on Bar:
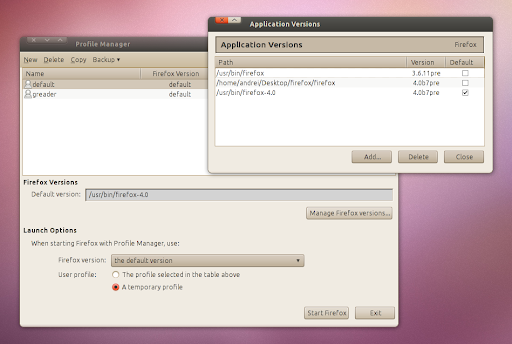
New Stand-Alone Profile Manager
The recent Firefox 4.0 builds come without a profile manager (so running Firefox with -profilemanager in Linux doesn't work anymore). The cause for this is a new stand-alone profile manager which should be introduced soon.
The new profile manager will allow you to manage multiple profiles easily including temporarily profiles - great for testing new Firefox versions. Also, you'll be able to choose which Firefox version to use (Manager Firefox Versions > Add) and for which profile so running multiple Firefox versions will become very easy.
This new, experimental profile manager does not come with Firefox for now but you can try it out by downloading it from HERE - available for Windows, Linux and Mac OSX (to use it in Linux: extract it and double click "profilemanager-bin").
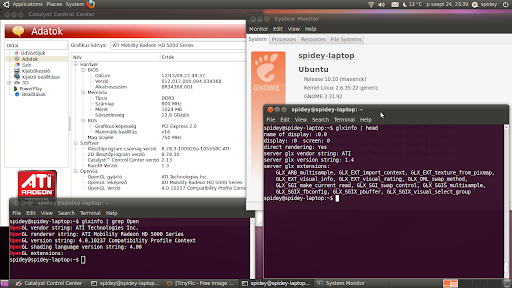
fglrx is the name of the Linux display driver used for ATI Radeon and ATI FireGL family video adapters and stands for "FireGL and Radeon for X". It contains free open source as well as proprietary and closed source parts. - Wikipedia
Fglrx was updated yesterday in Ubuntu 10.10 Maverick Meerkat and what's special about this is that it finally supports Xorg 1.9 and 2.6.35 kernel. Up until now, ATI users who've tried to install Fglrx or upgraded from Ubuntu 10.04 would get a blank screen. So if you have an ATI graphics card and want to use Fglrx, you can finally install / upgrade to the latest Ubuntu 10.10.
Further more, another update to Fglrx came today, brining compatiblity with kernel 2.6.36 (not yet available in Maverick but it nice to already have it).
This tip was sent by WebUpd8 reader Tamás Nagy who's also tested the new Fglrx drivers in Ubuntu 10.10 Maverick Meerkat and he says everything is working smoothly.
Sometime things break. It can be Compiz, the Gnome panels and so on. And if you cannot access their options, you cannot remove the faulty settings so one way to solve this would be to completely reset their settings.
But I've actually wrote this post for something trivial: because I receive A LOT of emails asking how to restore the sound icon (part of Indicator Applet) or some other Gnome Panel applets / indicators to their original state. Well, here it is:
Before reseting the Gnome Panel, if you just have some icon display issue, firstly try to restart the panel:
killall gnome-panel
If that fails, reset the Gnome Panels (will add both the Gnome panels and applets just like they were when you first intalled Ubuntu / other Linux distribution). Open a terminal and paste this:
The "gconftool-2 --recursive-unset" command should work with any application which stores its settings in Gconf (to see them all, press Alt + F2 and enter: gconf-editor). But it will (obviously) only reset the settings stored in Gconf so if you reset the Rhythmbox settings for example, the library won't be removed. And since I brought Rhythmbox into discussion, here is how to reset its music database:
Ubuntu 9.10 and newer:
rm ~/.local/share/rhythmbox/rhythmdb.xml
Older Ubuntu versions:
rm ~/.gnome2/rhythmbox/rhythmdb.xml
Ubuntu Tweak also includes an option to reset the Gconf settings, starting with version 0.5.6.
The WebUpd8 RSS feed experienced some issues yesterday which might have resulted in you getting the latest posts multiple times. Hopefully everything is now back to normal (starting with this post).
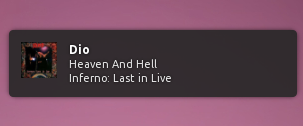
Spotify is great for the music it brings to its users but it lacks a lot of features. There are some native Linux Spotify clients (including an official one), but they don't support free accounts so those using the Windows version of Spotify under Wine (that's the only way to use Spotify with a free account in Linux) must use tweaks to make it a bit more functional, like the "fix" to make it play local mp3 files we wrote about a while back.
Here is yet another such 'tweak' to get the Windows version of Spotify (under Wine) to display NotifyOSD notifications for Ubuntu users. For this, you'll have to download Spotify-notify, a tiny application written in Python which displays notifications for Spotify on every song change. The script uses last.fm in order to fetch album cover and data.
Download and use Spotify-Notify
1. Before downloading Spotify-Notify, you'll have to install some dependencies required for it to run. Open a terminal and paste this:
sudo apt-get install python-xlib python-notify
2. Then, download Spotify-Notify, extract it and place it somewhere like in your home folder.
3. Run Spotify-Notify like so:
cd ~/spotify-notify #presuming you've place it into your home folder
python spotify-notify.py
You can either make a shortcut for it, make a script which starts both Spotify and Spotify-Notify or add Spotify-Notify to your startup application - it's up to you how you use it.
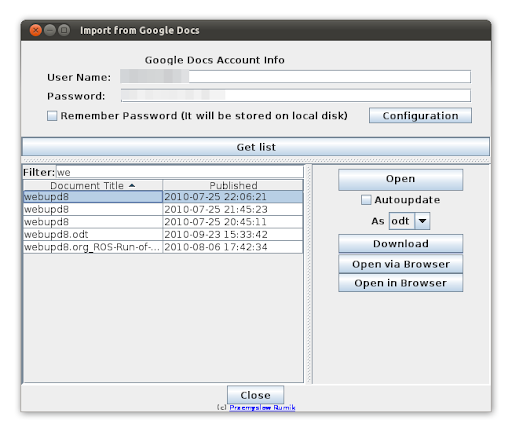
Ooo2gd is an OpenOffice addon which you can use to keep your documents synchronized with Google Docs, Zoho and WebDAV servers. You can either manually select to upload a file to Google Docs / Zoho when you're done editing it or you can select to automatically synchronize it.
Besides keeping the local files you're working on synchronized with these web services, the extension also allows you to import files which already exist on the server (Google Docs, Zoho, WebDAV) and either open them in a web browser or directly edit them via OpenOffice.
1. Firstly, make sure you have openoffice.org-java-common installed:
sudo apt-get install openoffice.org-java-common
2.Download ooo2gd and place the file on your Desktop, then use the following commands in a terminal (important: close any OpenOffice window before proceeding!!):
a) If you've installed OpenOffice from the official Ubuntu repositories (or a PPA):
cd ~/Desktop
sudo /usr/lib/openoffice/program/unopkg add gdocs_2.2.0.oxt
b) If you're using OpenOffice or Go-OO downloaded from their respective websites (not using native packages and thus the installation location is /opt/), use this command:
cd ~/Desktop
sudo /opt/openoffice.org3/program/unopkg add gdocs_2.2.0.oxt
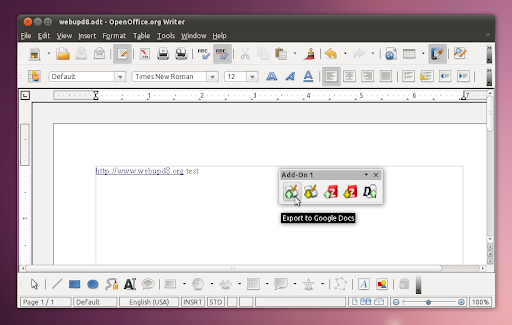
Once installed, open an OpenOffice document. A new addon window should pop up - use it to sync your files with Google Docs, Zoho and WebDAV servers:
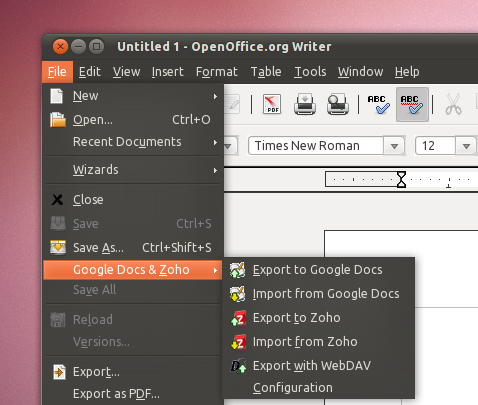
You can also select File > Google Docs & Zoho for import/export options:
For the Google Docs username, enter your email address as it seems only using your username fails sometimes.
Notes: Ooo2gd works with OpenOffice.org 2.0.4+ or StarOffice 8+ and requires Java 5 SE or newer. I've tested it on Ubuntu 10.04 Lucid Lynx with OpenOffice 3.2.1 and the Ooo2gd import/export is working properly with Google Docs and Zoho (WebDAV server not tested). Update: it also works in Ubuntu 10.10 (I've just tested it).
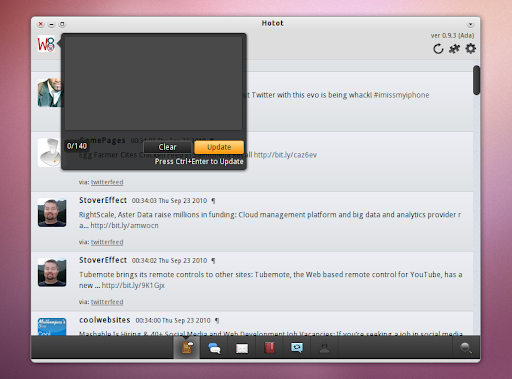
Hotot is a new lightweight Twitter client for Linux (though I see there's also a Windows package available too) which although still in Alpha, it already looks very interesting! It doesn't come with many features by default for now (other than the basic features you would expect to find in a Twitter client, including search), but it's extensible through add-ons.
The version I've tested comes with 3 preinstalled addons: Gmap (geolocation information of tweets), image uploader and image preview. Also, Hotot comes with native notification system for both Gnome and KDE (and NotifyOSD for Ubuntu users).
One interesting feature in Hotot is that you can close the window and then bring it back using a keyboard shortcut (Alt + C by default) so it never stays in your way yet always runs in the background waiting to be summoned. And the keyboard functionality doesn't end there as Hotot can be fully controlled using the keyboard: you can go to the previous or next page (where the pages are: your home timeline, replies, direct messages and so on), move between tweets, enter compose mode and so on. You can see all the available keyboard shortcuts by going to "Help & About" in the Hotot menu.
Try Hotot
The Hotot download page doesn't hold any packages yet, though it seems it will soon offer packages for all major Linux distributions. Until then you can run it in Ubuntu using the commands below:
sudo apt-get install python-webkit python-notify python-keybinder mercurial python-distutils-extra
cd
hg clone https://hotot.googlecode.com/hg/ hotot
cd hotot/
python ./hotot/hotot.py
Update: Hotot has an Ubuntu daily PPA. To use it, paste the following commands in a terminal:
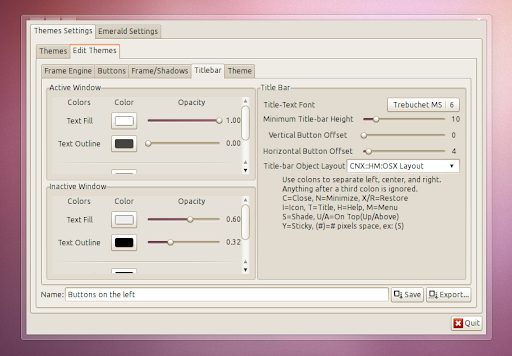
If you gave the buttons on the left a chance, you are now probably used to having them there and most Emerald themes come with the minimize, maximize and close buttons on the right.
Here's a quick tip for moving the minimize, maximize and close buttons on the left for an Emerald theme:
Open the Emerald Theme Manager (System > Preferences > Emerald Theme Manager), click "Edit themes", then go to the Titlebar tab and under "Title-bar object layout" on the right, you should be able to select "CNX:IT:HM:OSX Layout" from the drop-down. In case this is not there, simply copy/paste it.
If you don't want a window title (like for the LittleGrass Emerald theme), use the following code: "CNX:::OSX Layout". You can of course tweak the layout some more as all these parameters are documented under the "Title-bar object layout" option.
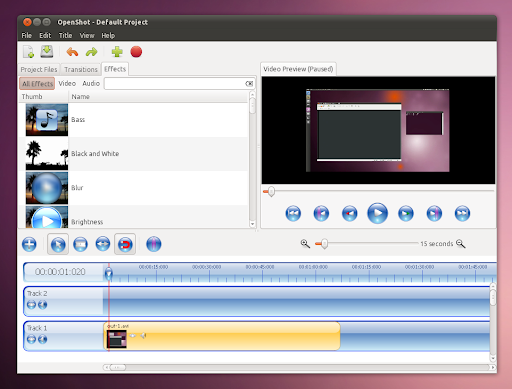
OpenShot is a non-linear video editor for Linux (GNOME) with an amazing set of features: you can resize, trim or cut video, it comes with video transitions with real-time previews, image overlays, title templates, video encoding, digital zooming, audio mixing and editing, digital video effects and well, most of the features you can think of.
OpenShot has been teasing us with the new features for a long time now and today, the new OpenShot 1.2.2 was finally released (1.2.0 and 1.2.1 were actually skipped). This version comes with 3D animated titles powered by Blender 2.5, custom transitions, new audio and video effects, DVD export, netbook friendly theme and lots of other improvements. The OpenShot 1.2.2 release announcement is very complete so check it out for a complete list of new features and more info.
OpenShot has its own Ubuntu (Karmic, Lucid and Maverick) PPA so it's very easy to install the latest version. Open a terminal and paste the following commands:
Update: it seems OpenShot does not work with Blender from the above PPA for some odd reason. There is however a way to use OpenShot with Blender - see the how-to here: https://answers.launchpad.net/openshot/+faq/1299
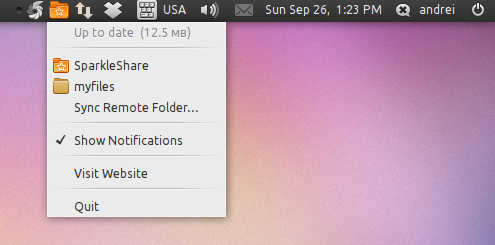
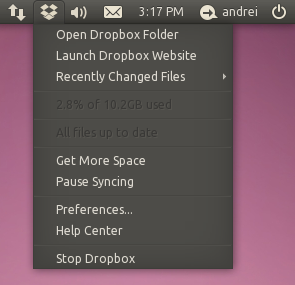
T. Scott Barnes maintains a package in his PPA called "monochrome-icons-extra" which comes with monochrome Ubuntu-mono, Humanity, and Elementary icons for Dropbox, along with a few other mono icons.
To add the PPA, use the following commands in a terminal:
Alternatively simply download this DEB file (but you won't receive any updates).
The icons no longer have to be manually copied into the ~/.dropbox-dist folder so if you upgrade Dropbox you will no longer lose the mono icons.
Important: the icons only work with the latest Dropbox experimental build which you can download from the Dropbox forum. To install the latest experimental Dropbox, run the following commands in a terminal:
32bit:
dropbox stop
cd
wget http://dl-web.dropbox.com/u/17/dropbox-lnx.x86-0.8.107.tar.gz
tar -xvf dropbox-lnx.x86-0.8.107.tar.gz
64bit:
dropbox stop
cd
wget http://dl-web.dropbox.com/u/17/dropbox-lnx.x86_64-0.8.107.tar.gz
tar -xvf dropbox-lnx.x86_64-0.8.107.tar.gz
The Ubuntu Light Themes - version 0.1.8 was released today (with a bit of a delay - these fixes were announced a week ago on the Canonical Design blog) and while it doesn't bring major changes, it improves the menu slowness (it seems the fix only improves the situation but does not completely solves it - see the comments on this post) and fixes bad contrast between text and background.
Here is the full light-themes 0.1.8 changelog:
Menuitem speedup
Subtle shadow on inactive notebook’s tabs
White text color on GtkProgressBar
Increased visibility of the resize gripper
Fixed contrast applied to elements in GtkStatusbar
More compatibility with custom color specified in Appearance Preferences
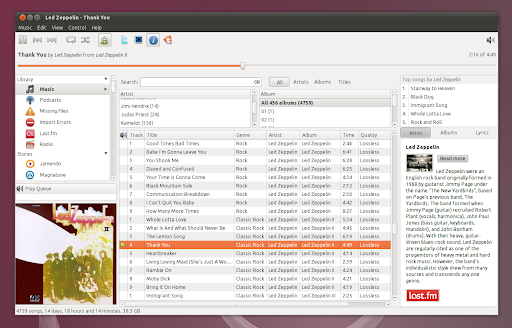
Today, a new project has been registered on Launchpad, called Rhythm-e. The project was registered by Ammonky - who's also behind Nautilus Elementary. No code has been published yet (update: the code can be found HERE), but you can get an idea on how it will look:
It's not finished yet but it's a really nice start! The above screenshot is not a mockup - it's the actually Rhythm-e (screenshot posted by Ammonkey HERE). Even though not implemented yet, the plan is to get video support as well as an advanced Clutter View into Rhythm-e!
Update: I was able to compile Rhythm-e. You can see all the new features in the screenshot already posted, there's only one thing to note: you can toggle the menu using F8, just like it is with Nautilus Elementary. Here is a screenshot from my computer (you can of course re-enable all the elements you see disabled in the screenshot):
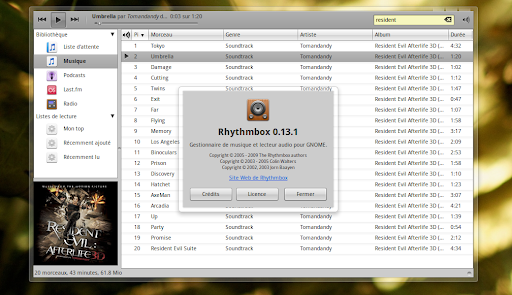
And here is the original Rhythmbox 0.13.1:
Without any connection with Rhythm-e, I've also found some Rhythmbox Elementary mockups posted @ Gnome-Look:
The above mock-up is a mixture of the Rhythmbox features and Nautilus Elementary user interface. You can see all the screenshots, here.
This leads us to the question: does Rhythmbox need a new interface? Also, what do you think of Rhythm-e?
Bricscad V10 stable for Linux was released some 2 weeks ago but we somehow missed the news. Well, better late then never... (thanks to Reddit).
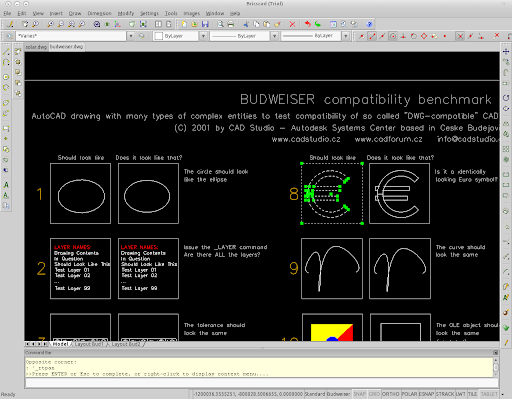
Bricscad V10 for Linux was released earlier this month (the stable version) and is the first .dwg based CAD software available for Linux - according to its website, although VariCAD also has .dwg support (I'm not sure about the difference between "support" and "based" in this case though). Though Bricscad is not free (and closed source), this is still great news for all those who previously needed to use Windows just because they've needed an .dwg based CAD application.
Existing applications and customizations written for Windows-based Bricscad and/or AutoCAD using LISP, DCL and Diesel APIs can run on Bricscad V10 for Linux without modification.
Bricscad V10 for Linux currently supports Ubuntu 9.10+, Fedora 12+ and OpenSuse 11.1+. I've tested Bricscad on Ubuntu 10.04 Lucid Lynx 32bit and it worked flawlessly: a (trial) Ubuntu .deb was provided (60mb) and after installing it, I was able to open the 2 CAD .dwg files I had on my computer. However, I didn't try to actually use it but I may give it a try later on. I'm not sure how AutoCAD looks nowadays, but Bricscad reminds me of the AutoCAD 2001 or 2002 I was using back in college.
For now, Bricscad is only available in English but support for other 15 languages is expected in the next few days.
The price ranges from 510,00 EUR and 360,00 EUR (these are the prices for my country - it may be different in yours), however there is a promo ongoing so you can get a discount for the Linux version if you get it now. The pricing is ridiculously low compared to Autocad (which costs $US4000).
You can try out Bricscad for free (30 days): Download Bricscard for Linux (includes .deb, .rpm and tar.gz files).
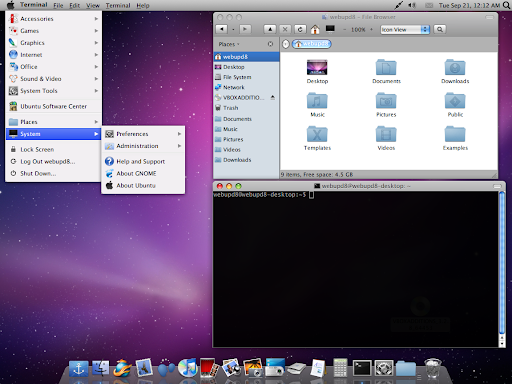
Although I am not a fan of copying an entire OS look (even though Ubuntu does some of it by default), I'm sure some of you want to get the entire Mac OSX look in Ubuntu. For that, you can use a script called Macbuntu which is very easy to use and can make your Ubuntu desktop look like Mac OSX in seconds.
Macbuntu is available as a stable version (2.2) for Ubuntu 10.04 Lucid Lynx but there's also an alpha version (2.3) for Ubuntu 10.10 Maverick Meerkat.
If you've used Macbuntu before, you should upgrade (run the upgrade script) as the latest version which was released today comes with new Plymouth themes: Paw-OSX (default), Paw-Ubuntu, you can select the distributor logo instead of Mac OSX, backup before applying the changes as well as bug fixes.
What does Macbuntu install?
The theme:
Macbuntu-10.04 theme based on GTK Leopard
Macbuntu-10.04-Icons based on Mac4Lin Faenza Icons
Macbuntu-10.04-Cursors based on Mac4Lin Cursors
Mac OSX backgrounds
Mac OSX fonts
It also includes Firefox, Thunderbird and Chrome themes
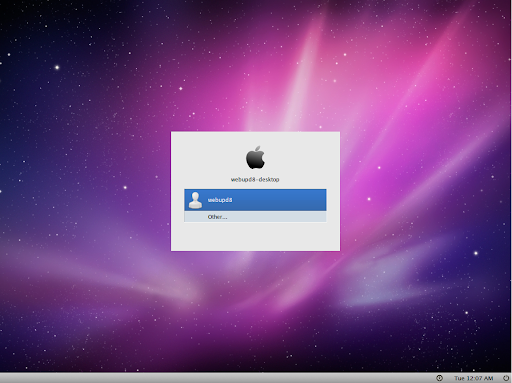
But Macbuntu is not only about a theme. It can also install: Global Menu, Docky, Ubuntu-Tweak, Cheese, Compiz Extras and will change the look of the Login screen, Metacity, set Compiz effects and modify the top panel completely.
(Macbuntu GDM login screen)
Download and run Macbuntu
To install Macbuntu, you can either manually download the archive, extract it and then run the "install.sh" script via a terminal or copy/paste the following commands in a terminal to download and run it:
Ubuntu 10.04 Lucid Lynx:
wget https://downloads.sourceforge.net/project/macbuntu/macbuntu-10.04/v2.2/Macbuntu-10.04.tar.gz -O /tmp/Macbuntu-10.04.tar.gz
tar xzvf /tmp/Macbuntu-10.04.tar.gz -C /tmp
cd /tmp/Macbuntu-10.04/
./install.sh
Ubuntu 10.10 Maverick Meerkat:
wget https://downloads.sourceforge.net/project/macbuntu/macbuntu-10.10/v2.3/Macbuntu-10.10.tar.gz -O /tmp/Macbuntu-10.10.tar.gz
tar xzvf /tmp/Macbuntu-10.10.tar.gz -C /tmp
cd /tmp/Macbuntu-10.10/
./install.sh
Then you'll be able to select what to install / tweak:
After Macbuntu finishes setting everything up, restart your computer and enjoy your new MacOSX-looking Ubuntu.
If you're upgrading from an older Macbuntu version, replace "install.sh" in the commands above with "upgrade.sh".
Uninstall
If you don't like the Mac OSX look after all, Macbuntu comes with an uninstall script. Use it (you'll have to redownload the packages in /tmp/ using the above commands, but don't run the "install.sh" script and instead, use the "uninstall.sh" script) like so:
Ubuntu 10.04:
cd /tmp/Macbuntu-10.04/
./uninstall.sh
Ubuntu 10.10:
cd /tmp/Macbuntu-10.10/
./uninstall.sh
Important: if you cannot turn on the desktop effects after uninstalling Macbuntu, search for "compiz" and "compiz-core" in Synaptic Package Manager and reinstall them, then everything should be ok.
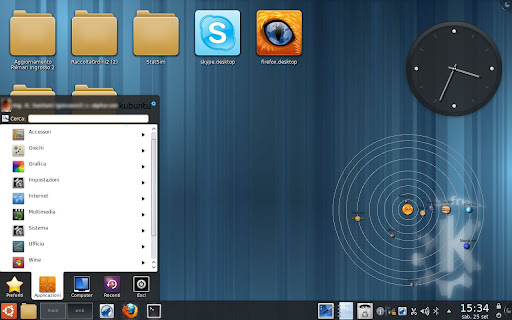
Cairo Dock - also known as GLX Dock - version 2.2 has finally been released! We already posted about most of the new stuff in GLX Dock 2.2 when we wrote about the beta version, but here's a small recap:
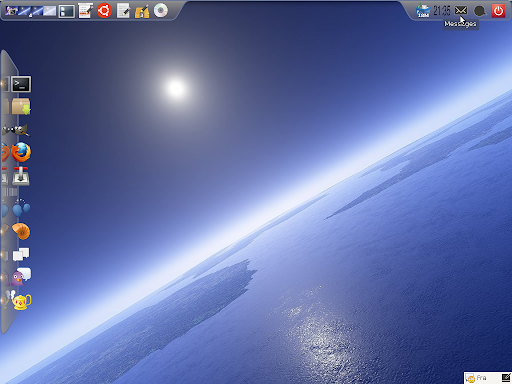
panel mode
2 new autohide modes (hide whenever the dock overlaps the active window" and "hide whenever the dock overlaps any window")
icons can be displayed when the dock is hidden
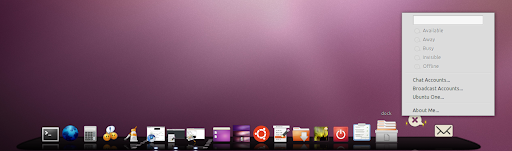
integration of the Me Menu and Messaging Menu applets
run multiple instances of Glx Dock
better support for old graphic cards
new default theme to match the Ubuntu Ambiance / Radiance themes and new wallpaper
other small enhancements: all the themes have been polished, you can now manage tasks in the Clock's calendar, use tiny URLs in the Drop-and-Share applet, the Dustbin applet handles all the drives and many more.
Here is another screenshot, provided by Fabounet in which you can see the panel mode / multiple GLX Dock instances, the MeMenu and Messaging Menu:
And of course, a video with Cairo Dock 2.2 in action (Cairo Dock in the video is the beta version but there haven't been many changes since then):
(make sure you watch it in HD - it plays in HTML5 if you've enabled it on YouTube!)
Install Glx Dock (Cairo Dock) 2.2 in Ubuntu
To install Glx Dock in Ubuntu, open a terminal and paste the following commands: